


Google Sheets has no Track changes button like the one in Microsoft Word, so there is no setting to turn on. Edits are saved straight into the file instead of showing up as suggestions you accept or reject.
When several people work on the same file, that makes it easy to lose important data or to need a previous version back. What Google Sheets does have is a few built-in tools that cover most of the same ground.
In this article, you’ll learn how to track changes in Google Sheets with notification rules, protected ranges, and version history. You’ll also see how to keep a log of historic values automatically with Sheetgo, an AI-powered data automation platform.
How to track changes in Google Sheets with notification rules
If you want to stay up to date on changes made to your Google Sheets, you can set notification rules according to the type of change and frequency of notification. This is how you can track changes in Google Sheets through notifications.
1. Open the Google Sheet and go to Tools > Notification settings > Edit notifications.
2. In the “Set notification rules” window, select “Any changes are made” to enjoy the same functionality as the “Track Changes” feature offers in other tools. Under “Notify me with…”, you can set the frequency of notifications. Here, I have selected “Email – right away”. Click “Save” once you finish.
In case you want to avoid receiving too many emails, we recommend setting notification rules to “Email – daily digest”.
3. As soon as you save the rule, Google Sheets will prompt you to “Edit” or “Delete” the rules you have set. You can also add additional rules here. Click “Done” when finished.
To stop the alerts, open the same window and click “Delete” next to the rule. For more on these settings, see how to get notified when someone edits your Google Sheets.
How to stop unwanted changes with protected ranges
Notifications tell you about a change after it happens. To stop changes to cells that shouldn’t move, such as formulas or reference data, protect them:
- Select the cells, then go to Data > Protect sheets and ranges.
- Click Add a sheet or range, check the range, and click Set permissions.
- Choose Restrict who can edit this range and pick who can still edit it, or choose Show a warning when editing this range if you only want people to think twice.
For whole files, sharing people as Viewer or Commenter instead of Editor does the same job. Our guide on how to protect cells or pages in Google Sheets covers every option.
How to see changes in Google Sheets with version history
To see what changed, not only that something did, go to File > Version history > See version history. Each version lists who edited the file and when, with their edits highlighted, and you can name a version or restore it. For a single cell, right-click it and choose View more cell actions > Show edit history to step through its past values. For a full walkthrough, see how to view the edit history in Google Sheets.
When version history isn’t enough: log historic values automatically
Dynamic data within spreadsheets constantly changes according to various inputs, formulas and external data sources we apply. Google Sheets’ cloud-based system is a fantastic tool for dynamic data. This is because of its real-time transfers, which means you receive the latest version of your data no matter what. But what happens when you want to track changes in Google Sheets and keep a record of the historic values from your dynamic data?
There are many instances where you would want to track previous values.
For example, to keep track of stock market prices over time to evaluate share investments or predict future prices. Or perhaps you need to track your organization’s KPIs to determine the next steps of your business strategy. So, how can you track changes in Google Sheets?
Unfortunately, Google Sheets does not yet offer a historical record feature. If you want to keep a log of data changes, you must manually copy and paste your records every time. This is extremely time-consuming and critically reduces the level of efficiency and productivity you’d otherwise have.
Sheetgo, an AI-powered data automation platform, solves this with its Append feature. The Append feature in Sheetgo automatically makes a record of all the changes made into a spreadsheet, so you don’t have to worry about a thing.
Below, you’ll see what the Append feature does and how to use it in the Sheetgo add-on to track changes in Google Sheets automatically.
Why record historical values?
Instead of entering, processing, and storing all your data in one file, a workflow keeps dynamic data safely separated and allows you to create a log of historical changes in one central master sheet. This enables you to:
- Keep a log of data changes at specific time intervals
- Save older versions of your data without copy-pasting to a new sheet
- Automate the entire data recording process
- Generate dashboards and charts to analyze trends over time
The same applies to any sheet that gets overwritten on a schedule. For example, if a CRM sync updates your sales pipeline sheet every night, each run replaces yesterday’s deal stages. Appending a copy of the data after each update keeps every version, so you can see how each deal moved over time.
The Sheetgo Append feature
The Append feature in Sheetgo will make a record of any data changes within a spreadsheet automatically. Sheetgo creates a workflow between your source data (the spreadsheet containing the dynamic data) and a new spreadsheet where your historical values will be recorded.
Sheetgo also gives you the opportunity to set an automatic transfer schedule. This means that you can determine the frequency when your new spreadsheet is updated with changes. With automatic transfers, you won’t ever need to open the spreadsheet to manually enter data again!
Now that you understand what the Append feature in Sheetgo does, let’s go through a step by step on how to Append your spreadsheet data in Google Sheets using the Sheetgo add-on.
How to track changes in Google Sheets
Let’s take the example of the stock market prices to demonstrate how to use the Append feature in the Sheetgo add-on.
In my spreadsheet, I update the same row every day with the latest stock prices for several tech companies.

However, in order to predict future prices and evaluate which companies I should buy shares in, I need to know how these stocks are performing over a period of time.
Instead of manually copy-pasting variables every day, I can create an automated workflow to carry out this task using the Sheetgo add-on.
1. Open Sheetgo
Sign up for Sheetgo if you don’t have an account yet.
Or, open the Sheetgo add-on directly from inside your Google Sheets file. In your spreadsheet containing your dynamic data, find the navigation menu and click on Extensions > Sheetgo > Start. The menu was called Add-ons when these screenshots were taken.
If not yet installed, get the add-on via Extensions > Add-ons > Get add-ons.

As we want to export this data, click Select data under the Export data section.
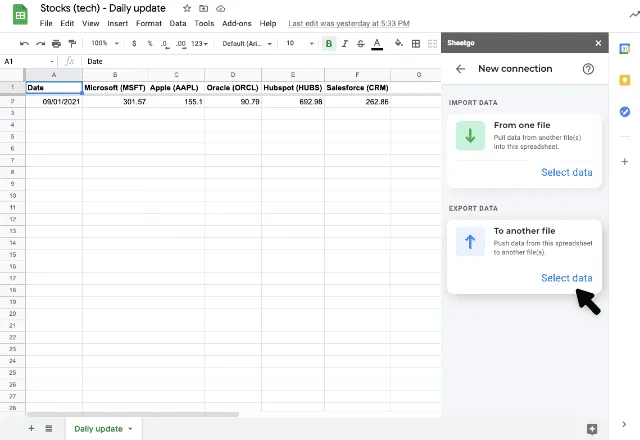
Make sure you select the correct tab with your dynamic data.

Under Settings, you can adjust features such as transfer formatting to make sure your data is transferred correctly. This includes any headers or data formats, such as dates, currency, or time.
As I have data formatted as a date in our spreadsheet, I will enable the Number formatting feature and make sure I select the correct Date format.

Once completed, press Continue.
2. Connect to a new Google Sheets file
It’s time to connect your spreadsheet to a new file. Under the Send data section, select Google Sheets. We want to create another Google Sheets file where our historical values will be recorded.
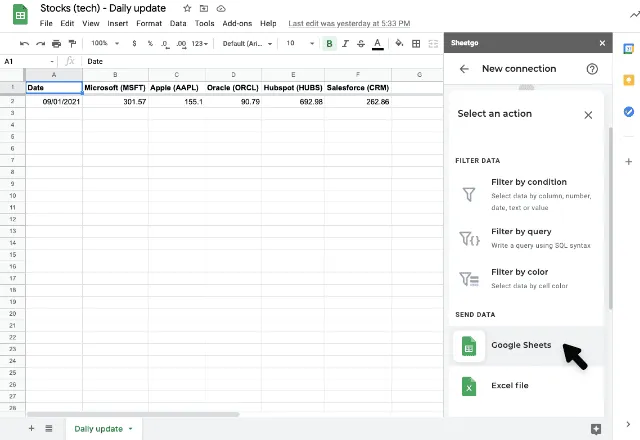
Here, you can make changes to your new file name, tab name and destination. To make sure I don’t mix this new sheet up with our original file, I have named it “Stocks (tech) – Historical data”.
3. Append your data
To activate the Append feature, click on the Settings section located underneath the file information. Simply slide the button to enable the Append feature.
You can also adjust the other settings depending on your needs:
- Lock destination tab: Enabling this will prevent any edits made to your destination file. Sheetgo will remove any edits made after each automatic transfer.
- Parse data: Sheetgo will identify and transfer any numbers, text, and formulas in your spreadsheet. If unchecked, Sheetgo will simply transfer your values as raw data instead.
Once finished, press Finish and save.

4. Edit your Automate schedule for data transfers
You should now see your completed connection on the right-hand side of your spreadsheet. Now, we can adjust the automation settings to determine the frequency with which Sheetgo transfers the data from our original file to the new file.
To schedule automatic transfers of your data, select the Automate button.

Once you are happy with your transfer frequency, press Save.
5. Enjoy your new historical value data in Google Sheets!
Your connection is now up and running! When you access your new spreadsheet, it should look something like this:

Your fresh data will append below the existing data entries every day. You can now track changes in Google Sheets automatically. You don’t even need to open a spreadsheet! To adjust the update schedule or switch off automatic updates, just open the add-on and change the settings.
Automatically track changes in Google Sheets with Sheetgo
And there you have it! Using the Sheetgo add-on, you can create a workflow that not only tracks your historical data, but also automatically transfers your data for ultimate efficiency.
Interested in learning more about Sheetgo’s useful features? Discover our Merge function in our blog post on How to merge multiple sheets in Google Sheets. To build a running history from CSV exports instead, see how to append CSV files and track historical data.
Alternatively, take a look at our related articles below!


 English
 Español
 Português do Brasil
 Français