




One of the most common issues among Excel users is finding a reference to a sheet that doesn’t seem to exist. Although you may quickly assume that the reference or formula is wrong, the solution could be as simple as unhiding the tab or sheet that is hidden.
In this article, you’ll discover the three methods to effectively unhide Excel sheets. First, you’ll learn how to unhide Excel sheets manually. Secondly, how to unhide all sheets at once using VBA. And third, how to unhide all sheets using Custom View. Finally, you’ll learn a quick way to find hidden sheets and how to protect them with a password.
How to unhide Excel sheets?
If your worksheet contains only a few hidden sheets, then the quickest way is to unhide them by right-clicking on the tabs in Excel. Let’s see how this can be done.
1. Right-click on any tab and then select “Unhide…” from the drop-down menu.
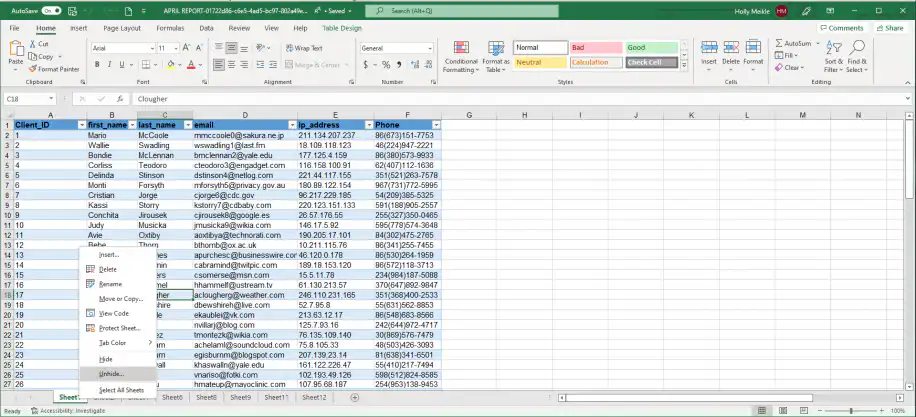
2. Select the sheet to unhide and click “OK”. In Excel for Microsoft 365, you can hold Ctrl or Shift to select several sheets at once.
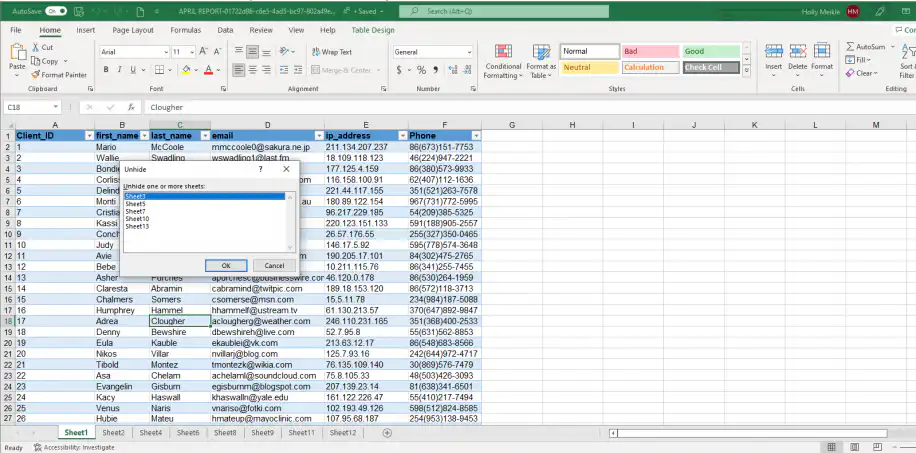
Now that you know how to unhide a worksheet in Excel manually, let’s see quicker methods to achieve this in case you have various hidden worksheets.
How to unhide all sheets in Excel?
Depending on the size of data contained in Excel, it is common practice to hide the sheets that may be less important for instant viewing. However, unhiding each by right-clicking on each tab can become a little tedious. Let’s see the two ways to unhide all sheets at once in Excel using VBA and Custom View.
How to unhide sheets in Excel using VBA?
The VBA (Visual Basic for Applications) functionality lets you quickly hide and unhide sheets. This is how to unhide sheets in Excel using VBA.
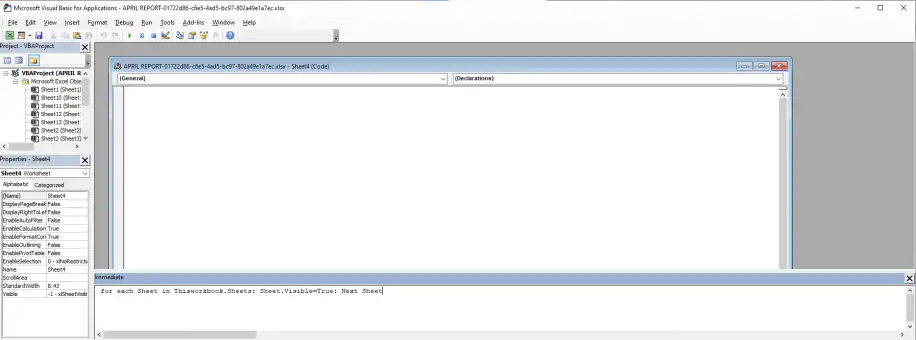
1. Right-click on any tab and select “View Code” from the pop-up menu to launch the Visual Basic Editor.
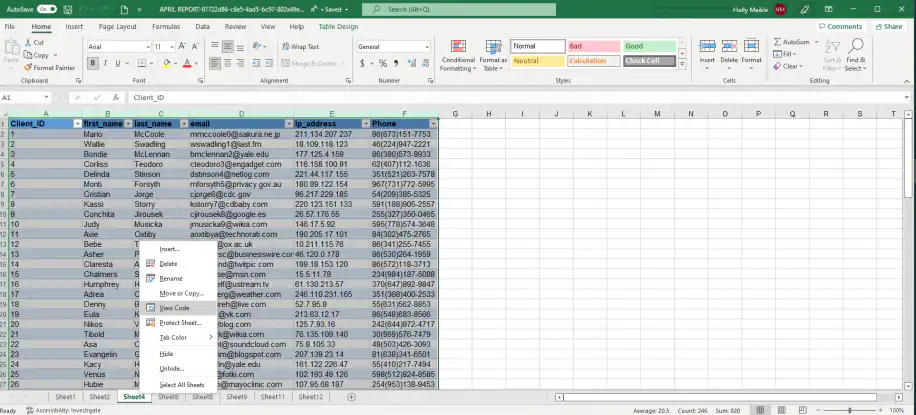
2. Go to View > Immediate Window.
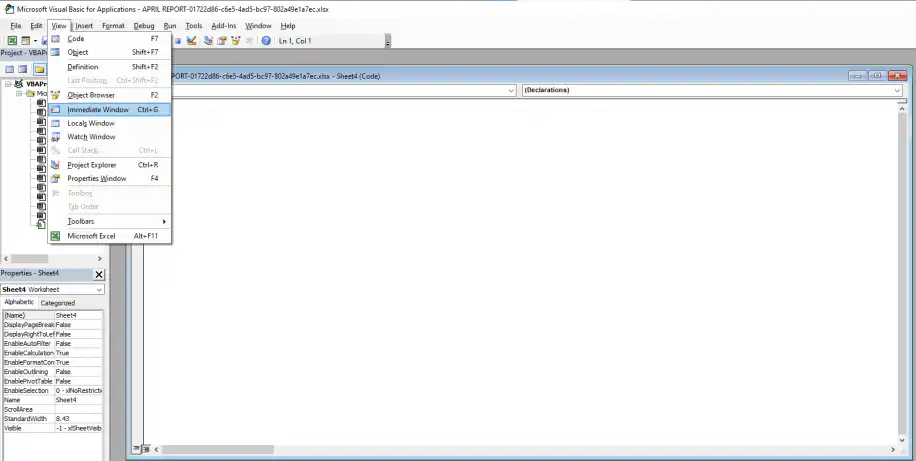
3. Copy the following line of code and paste into the “Immediate” window.
For Each Sheet In ThisWorkbook.Sheets: Sheet.Visible = True: Next Sheet
4. Then, press “Enter”.
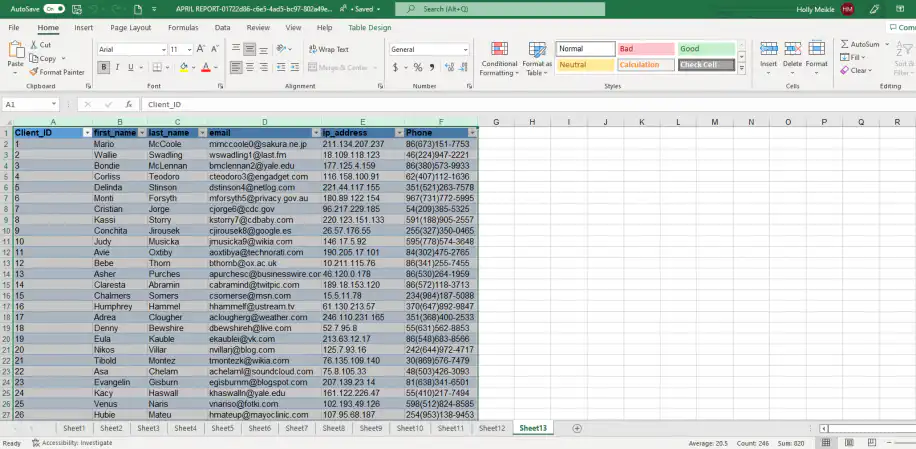
5. Go back to your Excel workbook, and you’ll see that all sheets are now displayed. This also unhides very hidden sheets, which a macro can hide so they don’t appear in the Unhide dialog.
Now, let’s see how you can quickly unhide all sheets using an alternative method.
How to unhide sheets in Excel using custom view?
Like VBA, the “Custom View” functionality in Excel allows you to hide and unhide all sheets at once in Excel. However, to use this method to unhide sheets, you will first need to create a view with all sheets unhidden to be able to activate the unhidden view. Moreover, Custom Views is grayed out if any sheet in the workbook contains an Excel table.
How to create a custom view for unhidden sheets in Excel?
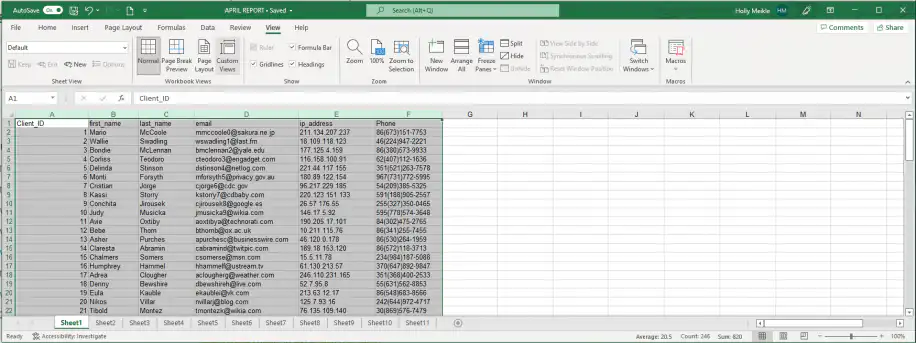
1. Go to View > Custom Views.
2. Click on “Add…” to access the “Add view” dialog box.
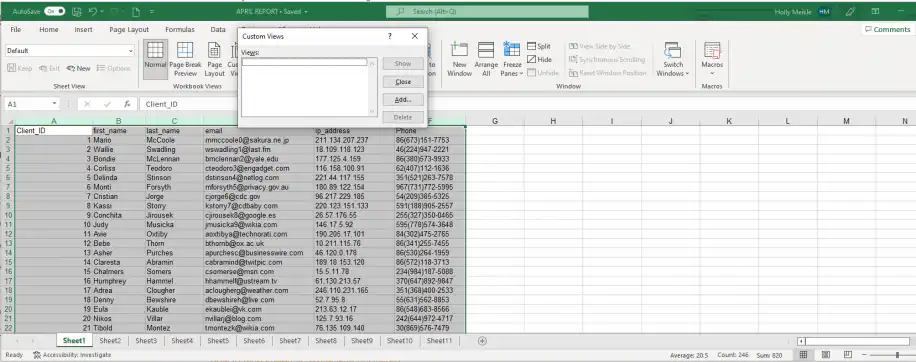
3. Name this view, and click “OK” to save.
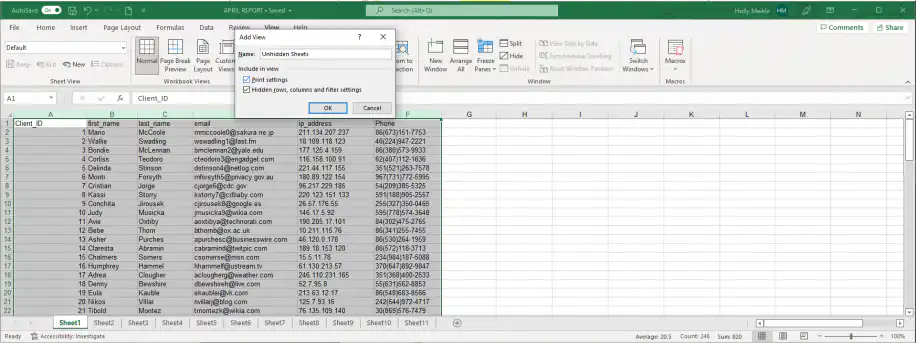
Now you’ve created the Custom View where all sheets are displayed, let’s see how to access it to quickly unhide all sheets in Excel.
How to activate a custom view to unhide sheets in Excel?
You can activate a Custom View anytime you want to unhide all sheets in Excel. Follow these steps to activate your Custom View.
1. Repeat the first step from the previous section.
2. Select the view you created earlier and click “Show”.
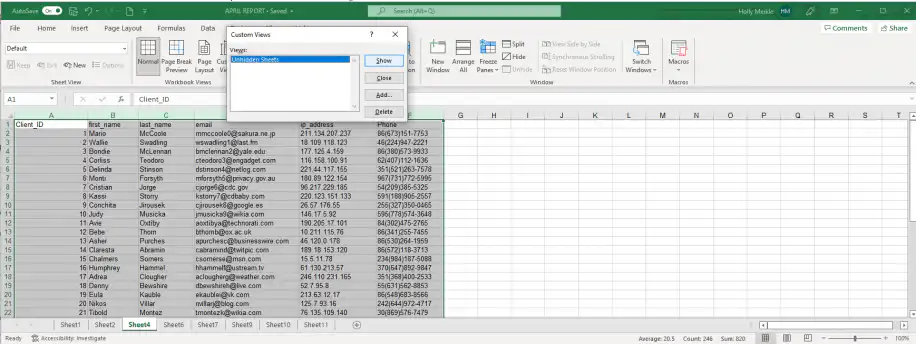
And that’s it. All your sheets should now be visible.
How to hide sheets in Excel with a password?
Excel has no option to put a password on a single hidden sheet. Instead, you protect the sheet to lock its cells, then protect the workbook structure so nobody can unhide your hidden sheets without the password. Follow these steps to protect an Excel sheet with a password.
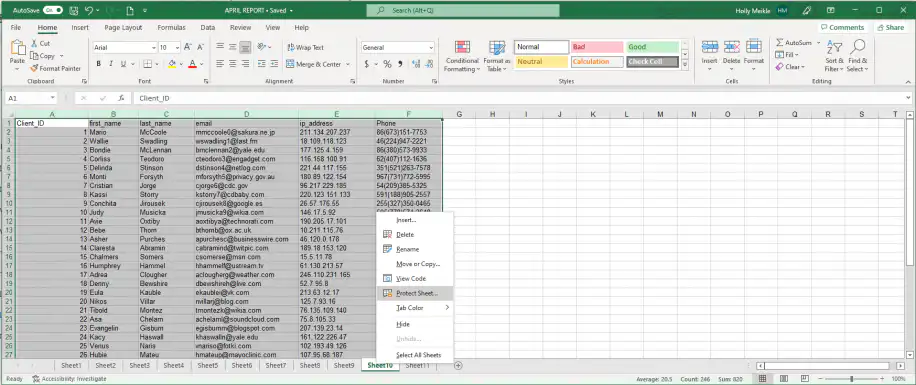
1. Right-click on the sheet you would like to hide with a password and select “Protect Sheet” from the pop-up menu.
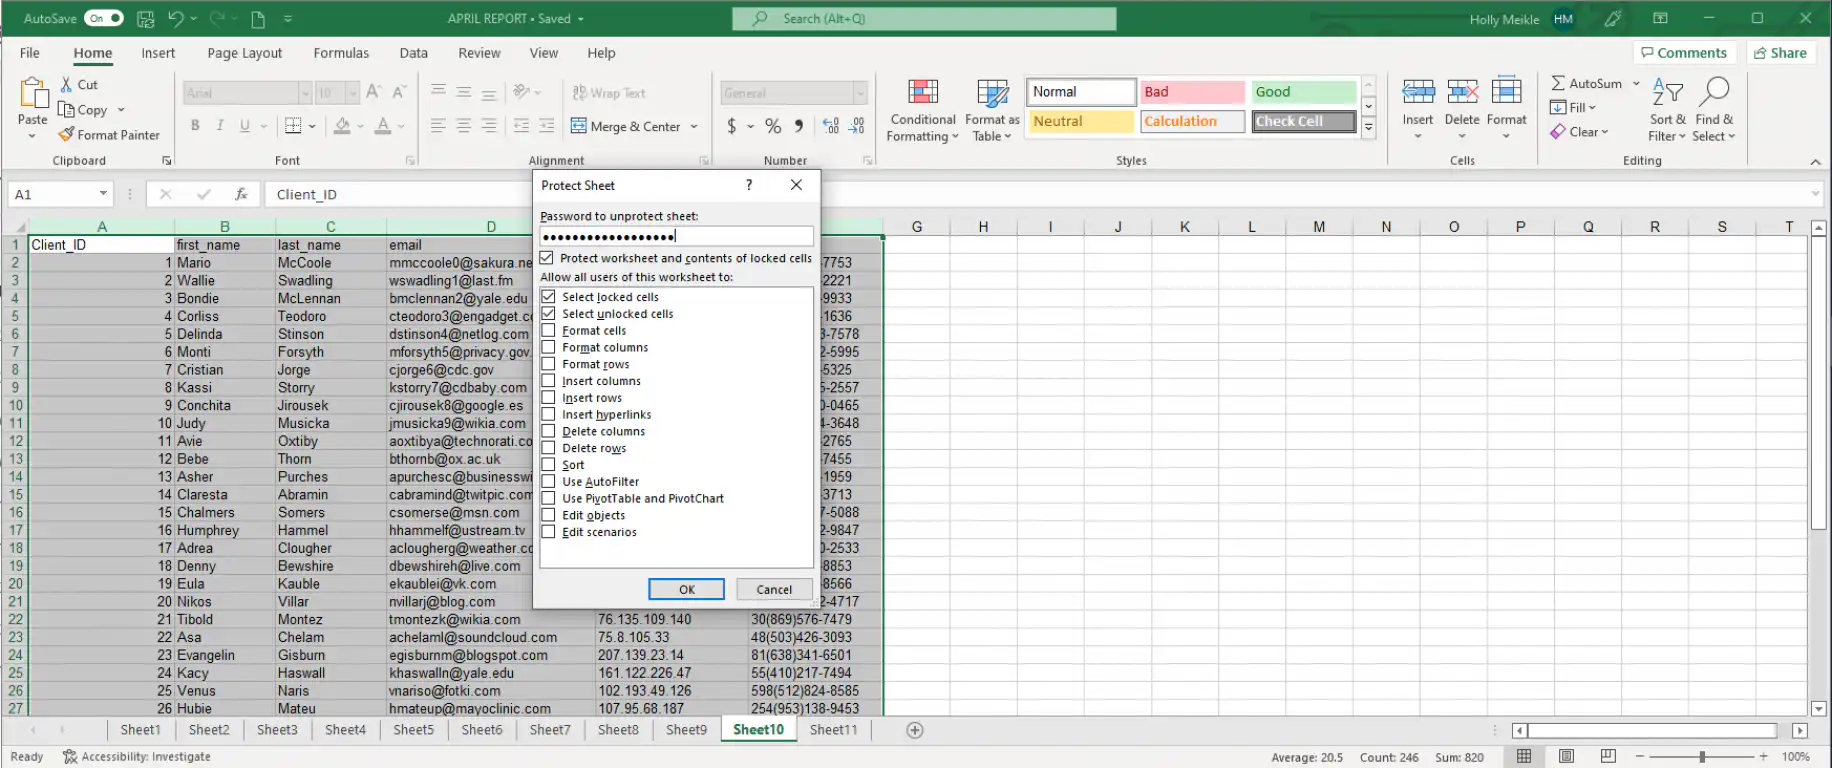
2. In the “Password to unprotect sheet” field, create your password. Tick any of the option boxes below to customize user restrictions. Once finished, click “OK”.
3. Excel prompts you to enter the password again to confirm. Click “OK”.
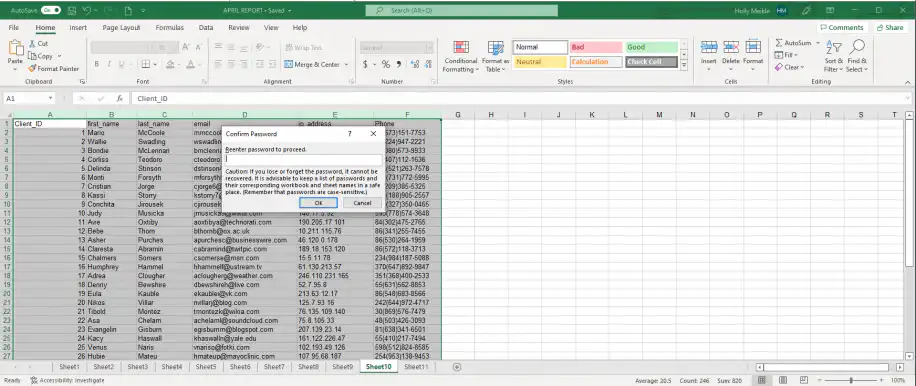
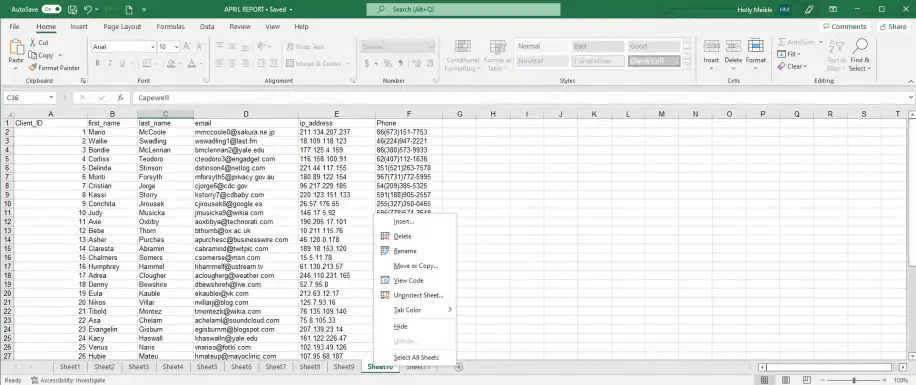
4. Right-click on the tab and you will see “Unprotect Sheet…” in the menu. The sheet is now protected.
Doing this will restrict other users from making any changes to the cells contained in that sheet unless they enter the password. It doesn’t stop them from hiding or unhiding sheets, though. To keep a sheet hidden, right-click its tab and select “Hide”. Then go to Review > Protect Workbook, keep “Structure” checked, and enter a password. The Hide and Unhide options stay grayed out until someone enters that password. For more options, see how to protect an Excel workbook from editing.
Conclusion
Learning how to hide and unhide sheets in Excel using VBA or Custom View is a great way to save time and boost productivity, no matter the size of your data.
In this article, you have learned three ways to unhide Excel sheets, which can also be helpful in case you want to hide them again later. You have seen how to unhide them individually and in bulk using VBA or Custom View. You have also learned to unhide every sheet, very hidden ones included, with a single line of code, and how to protect them with a password.
If you would like to explore further ways to collaborate in Excel without losing control of your data, check out the following articles:
- How to use Excel sheet view for easy collaboration?
- How to password-protect an Excel file?
- How to remove a password from Excel? (multiple methods)
- How to share an Excel file?
If some columns are hidden too, see how to unhide columns in Excel. Working in Google Sheets instead? Here’s how to unhide sheets in Google Sheets. And if your hidden sheets hold data you copy in from other files, Sheetgo’s AI automations can bring that data in for you and keep it up to date.

 English
 Español
 Português do Brasil
 Français