


Excel spreadsheets are widely used for online collaboration in companies big and small, especially since the release of the latest version. For example, if you want to share an Excel file so that multiple users can work on it simultaneously, the 365 version includes powerful co-authoring features to collaborate online. However, let’s say that you only want certain parts to be editable because there are complex formulae or reference cells that should not be modified. This is where knowing how to lock specific cells in Excel comes in handy – all users will be able to view all data but can only edit specific parts.
In this article, you’ll learn how to lock an Excel spreadsheet from editing according to the level of protection you’d like to apply. There are 5 different protection methods, including “Mark as Final”, protecting it with a password with a read-only status, and protecting specific cells. If you’d rather share only part of the data, Sheetgo, an AI-powered data automation platform, can transfer filtered Excel data to another workbook and keep that copy updated automatically.
How to protect an Excel workbook from editing?
One of the great advantages of using Excel spreadsheets is that it offers different layers of protection and different ways to do so. Here, you’ll learn how to protect an Excel workbook using 5 quick and efficient methods.
Protect an Excel workbook from editing by using Mark as Final
The “Mark As Final” is a protection feature for your whole workbook. This is how you can protect an Excel workbook from editing by others.
1. Open the Excel file you’d like to “Mark As Final”. Go to File > Info > Protect Workbook > Mark as Final.
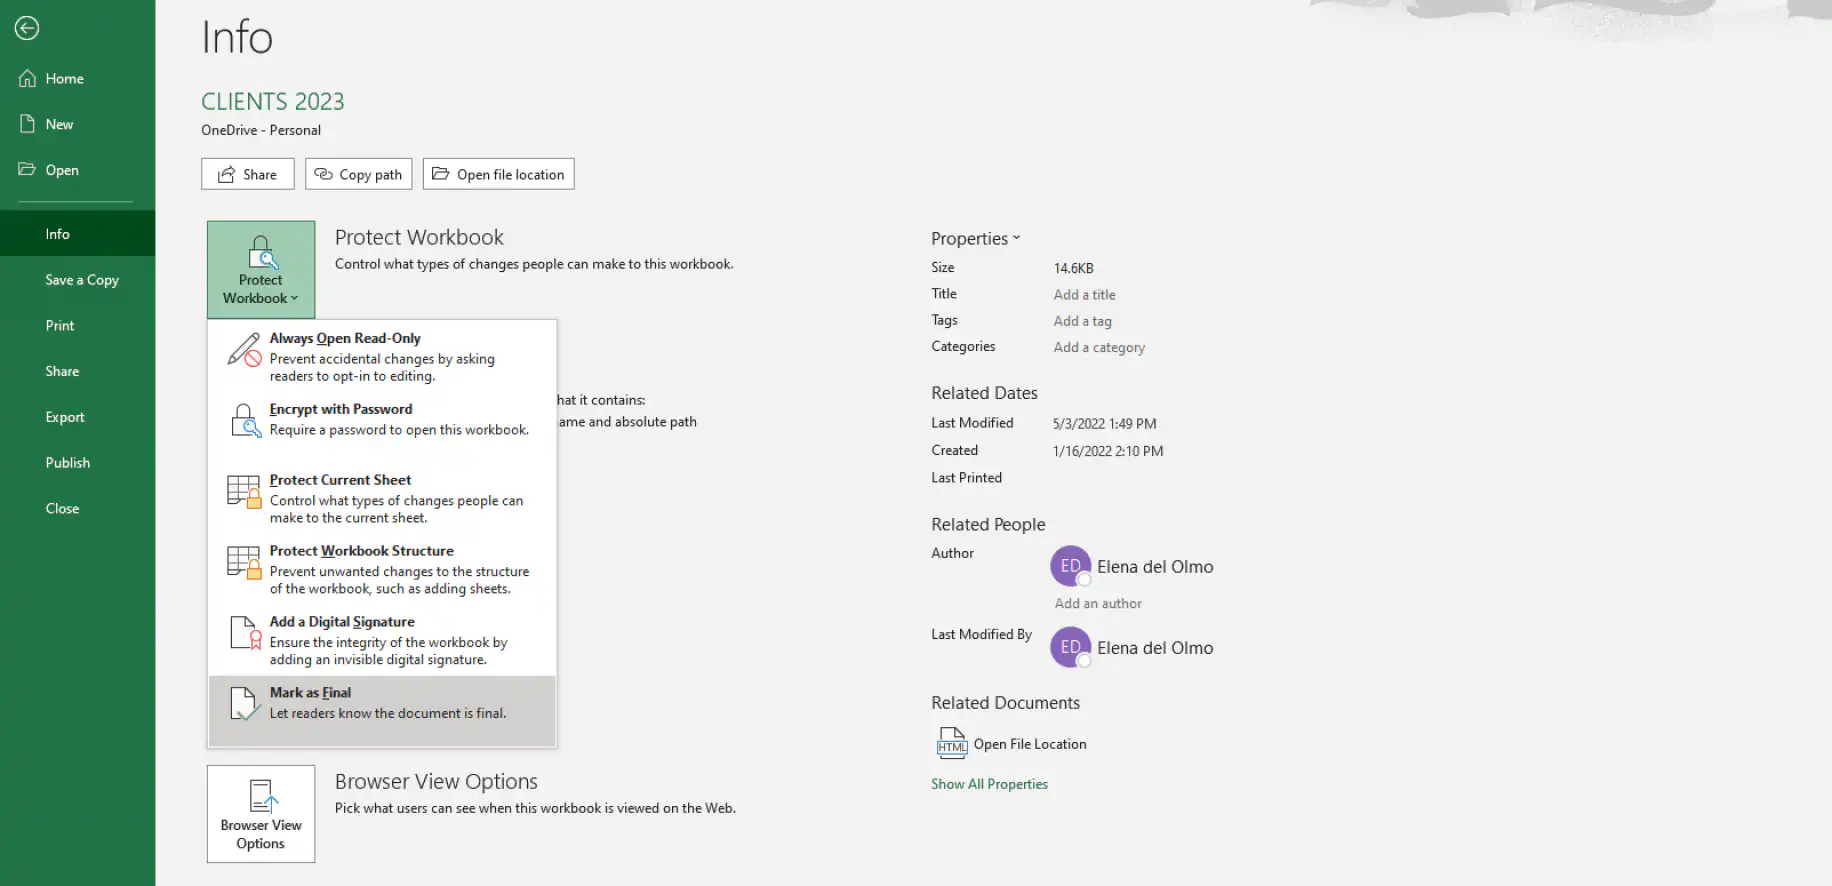
2. Click “OK” to save with that status.
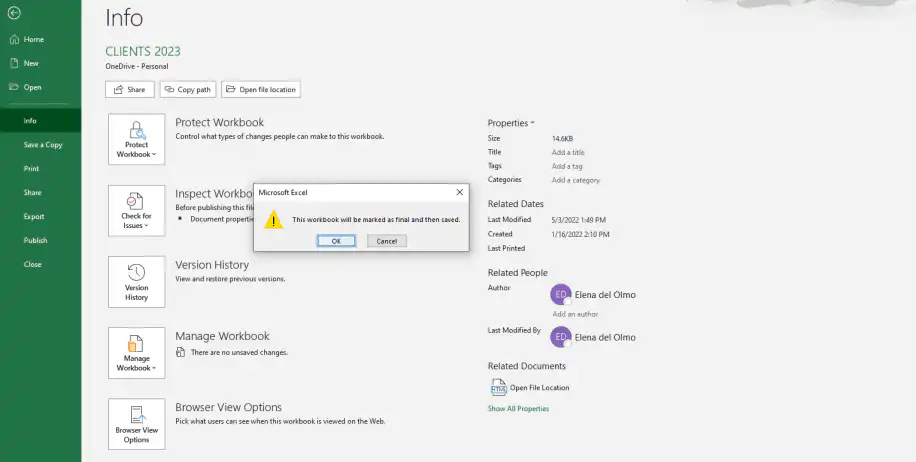
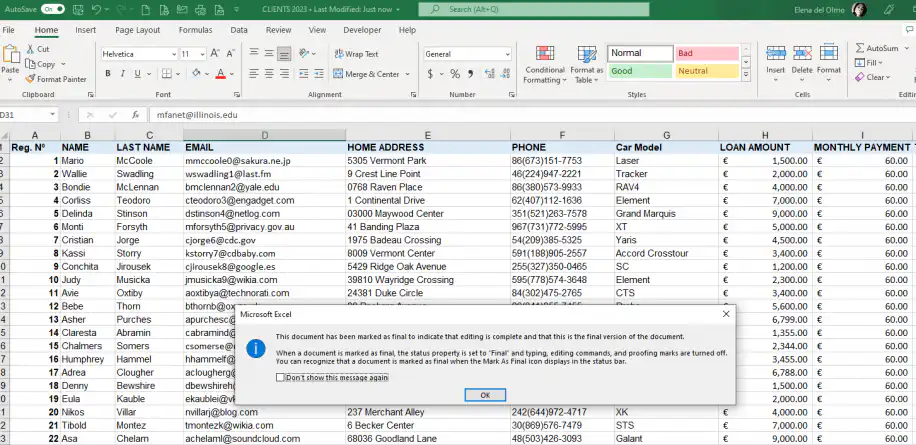
3. Excel reminds you about the “Mark As Final” status and how to know if a file has been set to “Final” by checking the status bar, located at the bottom. Click “OK” to continue.
4. Check the status by reopening the file. Excel should now prompt you with the following warning message. To edit, you simply need to click on “Edit Anyway”.
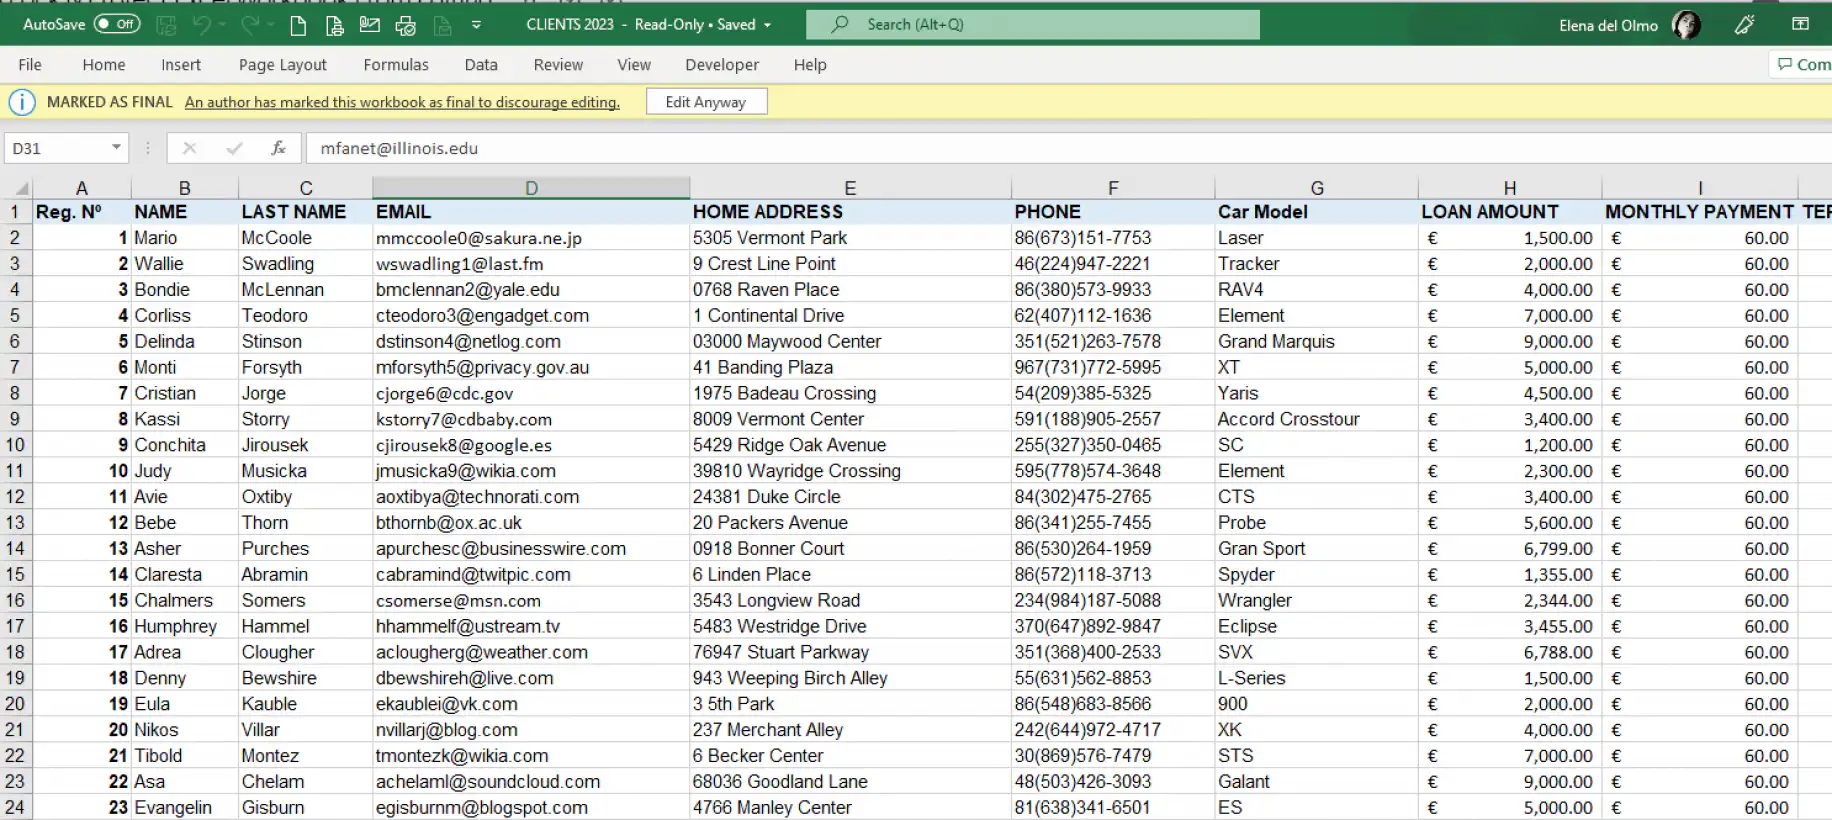
As you can see, more than a full protection measure, it’s a warning for other users to avoid editing since you can easily remove the “Mark As Final” status by clicking on “Edit Anyway”, as shown above. If you want to protect your workbook from editing completely, then you will have to protect it with a password.
Protect an Excel workbook from editing with a password
If you encrypt your Excel Workbook with a password, you’re restricting others from opening the file. Unless you provide them with the password, they won’t be able to view or edit the data.
1. Open your Excel file and go to File > Info > Protect Workbook > Encrypt with Password.
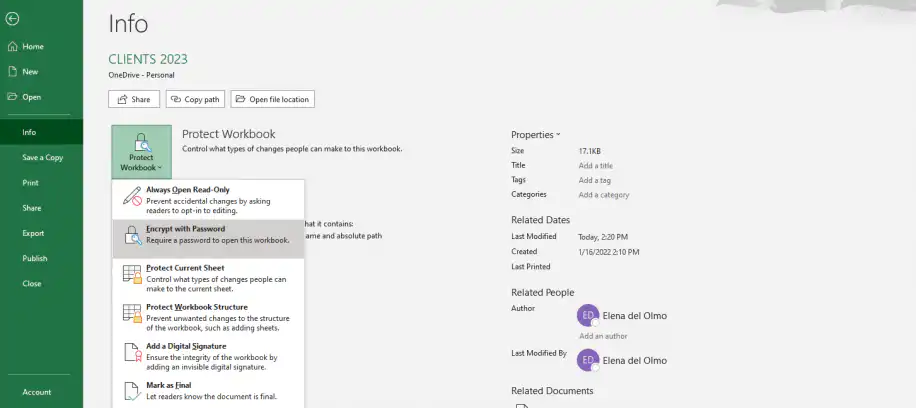
2. Enter the password and click “OK” to save. Make sure that you read Microsoft’s “Caution” message about passwords.
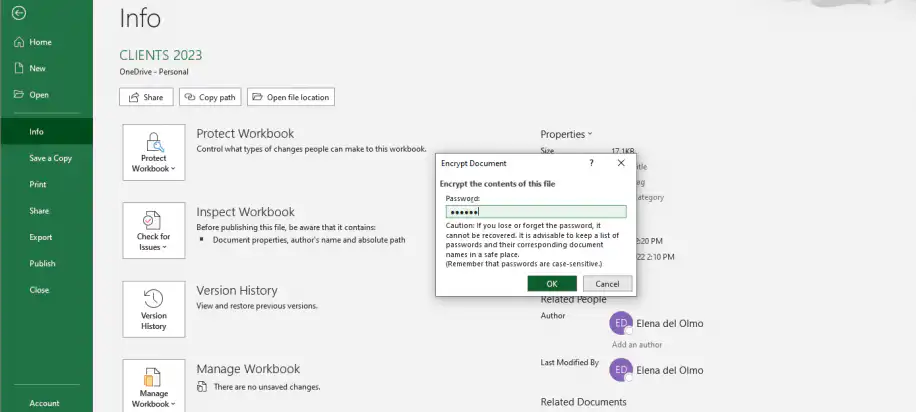
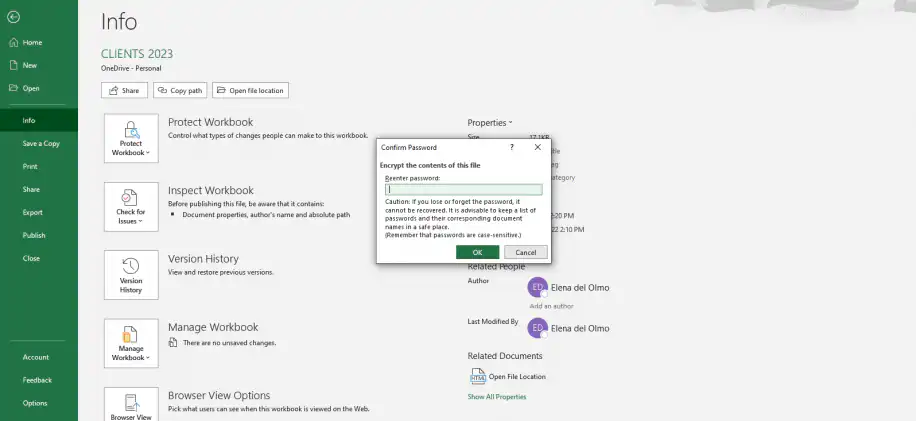
3. Re-enter the password to confirm. Click “OK”.
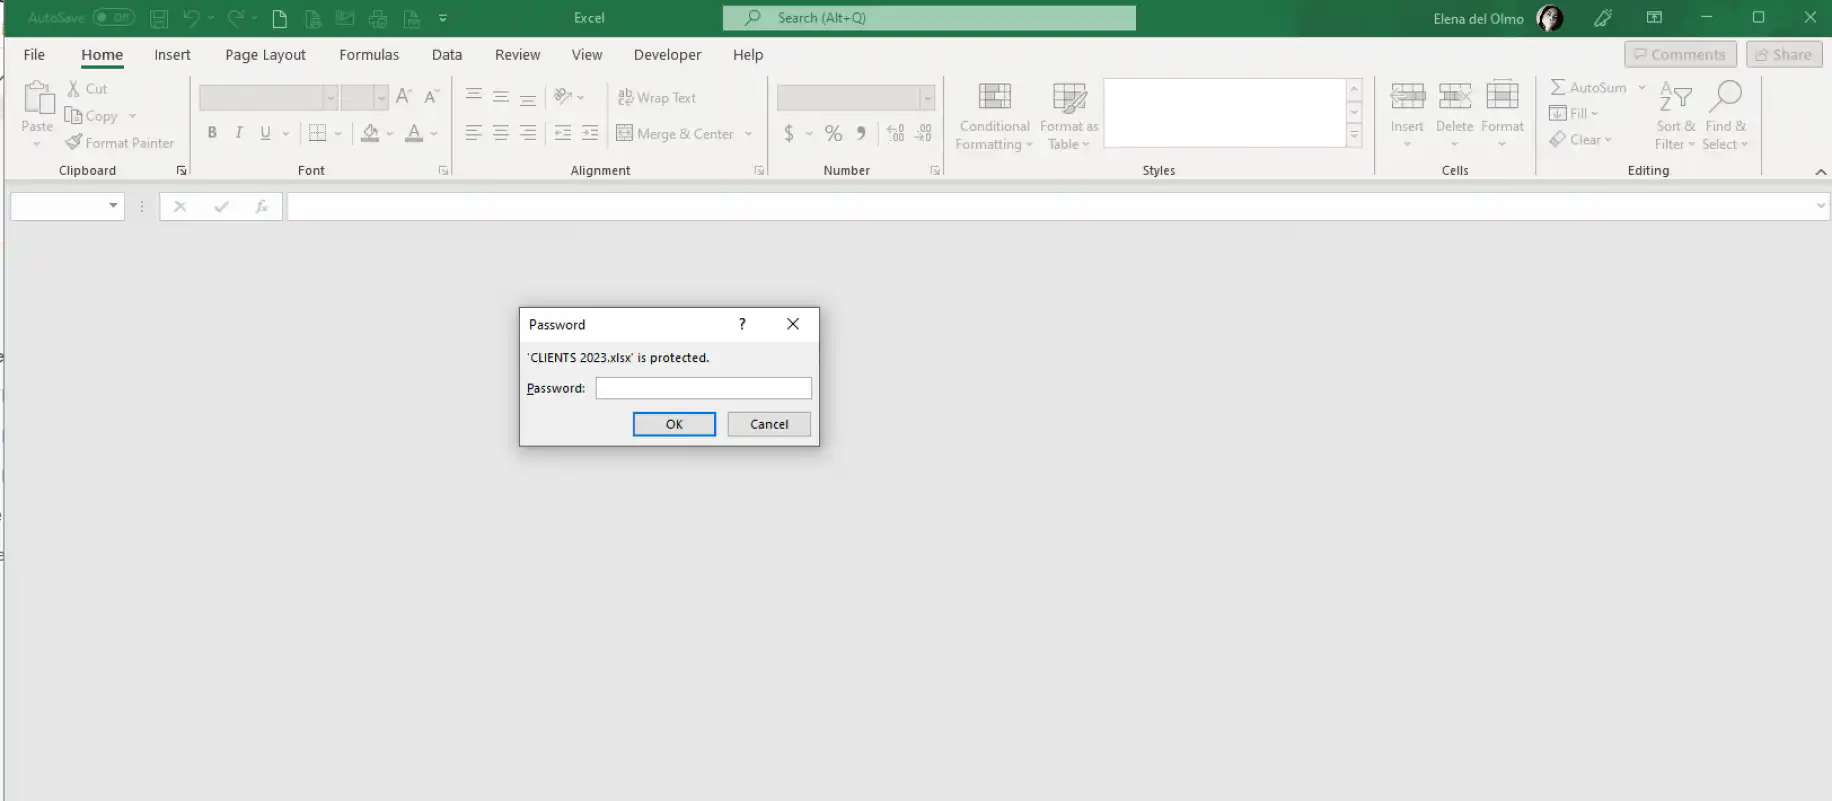
4. To check that this method worked, reopen your workbook. Excel should automatically prompt a message to enter a password.
Check out how to password-protect an Excel file to gain a more in-depth understanding of how protection works in Excel. Once your file is password-protected, you might be interested in learning how to remove a password from Excel.
If you want to try out more advanced methods of protecting and unprotecting your file, read protect and unprotect a sheet in Excel, which illustrates how it can be done using the Visual Basic for Applications (VBA) feature.
Protect an Excel workbook from editing but allow read-only
Allowing other users to open as “Read-Only” is a weaker level of protection since any user can still open the file and enable editing themselves. However, just like “Mark As Final”, it can serve as a precautionary measure for your team to be more careful when editing.
1. Open the Excel workbook you’d like to protect with “read-only” and head over to File > Info > Protect Workbook > Always Open Read-Only.
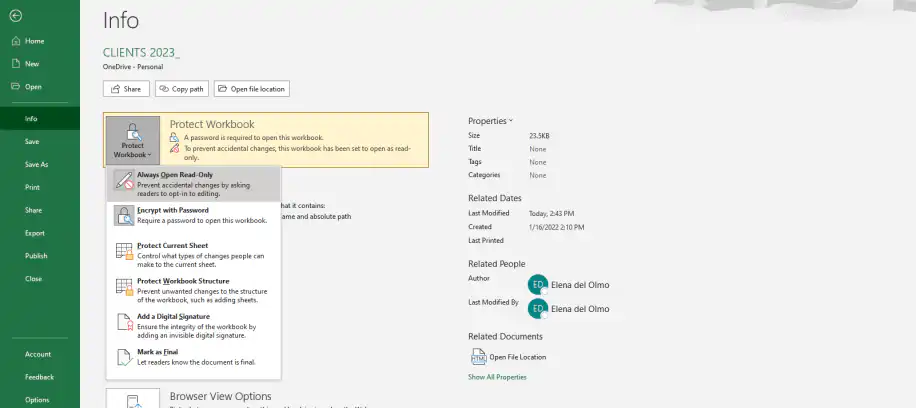
2. Any user who tries to open the file will get the following warning message. To continue editing, simply click on “Edit Anyway”.
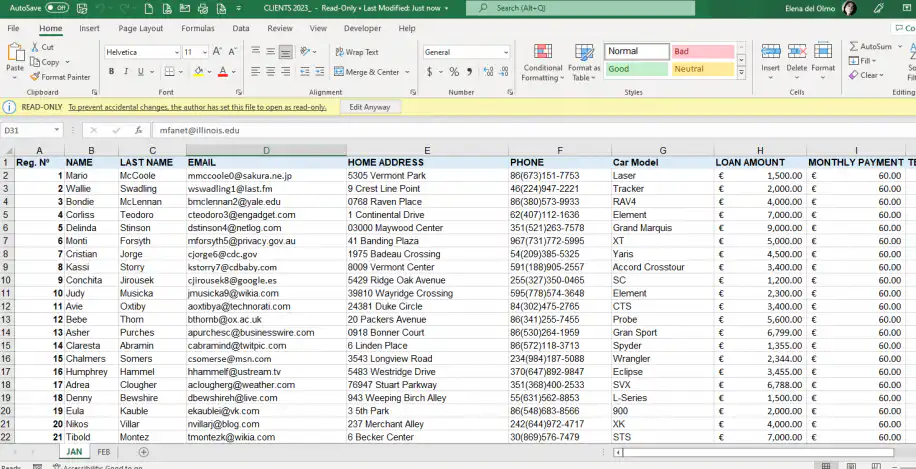
As you’ve seen, you simply need to click on “Edit Anyway” to be able to make changes. However, it’s useful to learn how to remove this feature as there may be other reasons why you may want to remove read-only from Excel.
Protect the structure of an Excel workbook from editing
Protecting the structure of your workbook will restrict others from deleting current sheets or adding new ones; in other words, it restricts others from using structural commands. This is how you can protect your Excel workbook from structural edits.
1. Go to File > Info > Protect Workbook > Protect Workbook Structure.
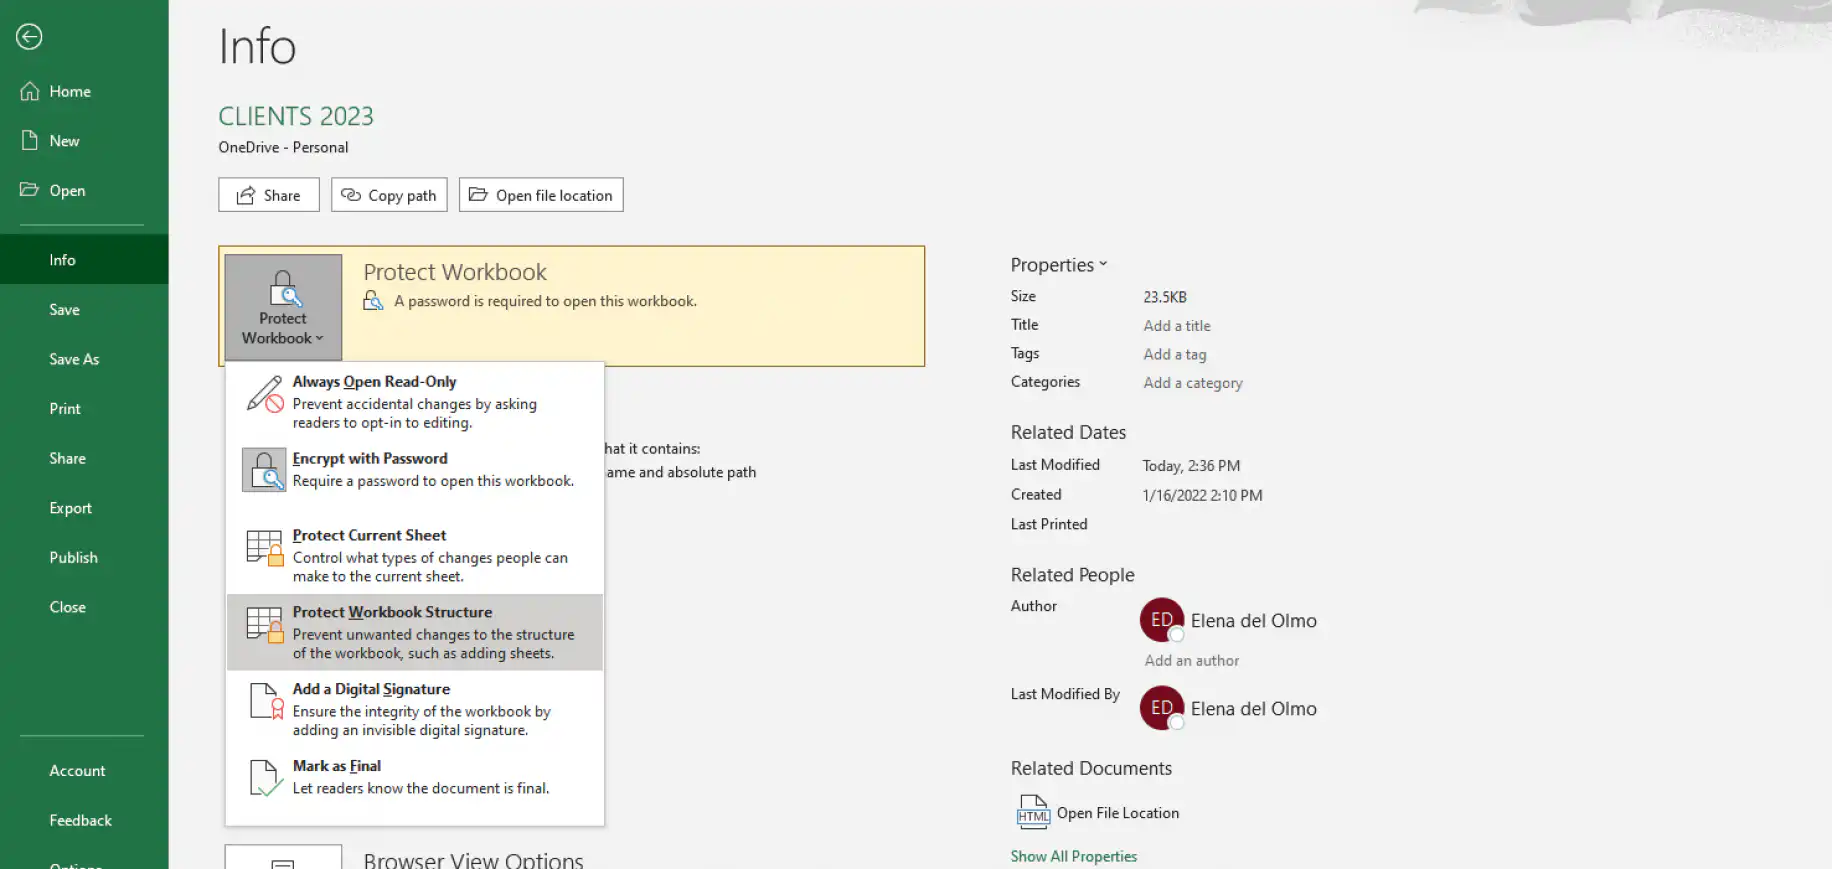
2. Enter a password and click “OK”.
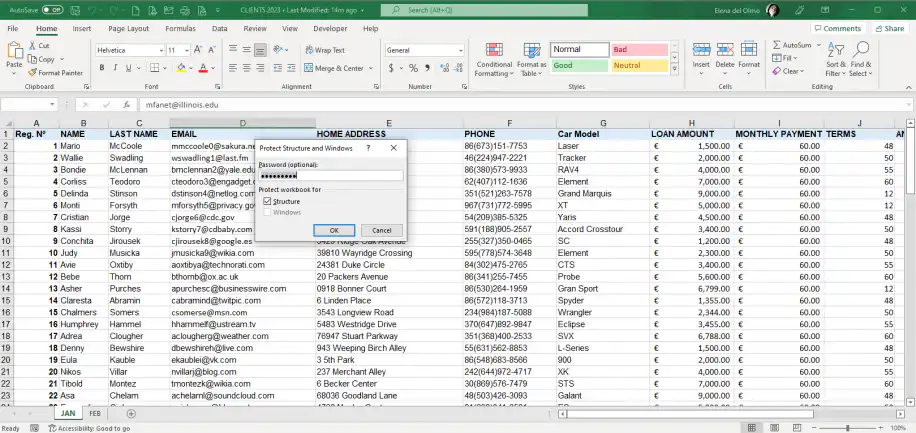
3. Confirm the password by entering again. Click “OK” to finish.
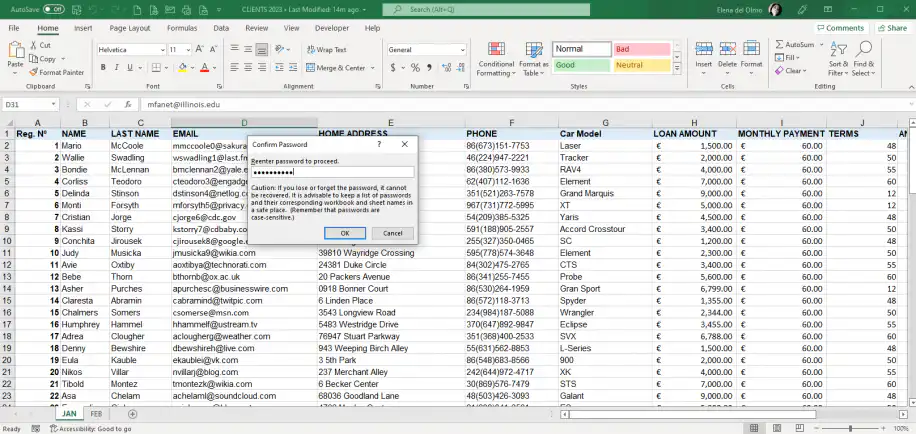
4. Double-click on a sheet name to rename, and Excel should prompt you with the following message.
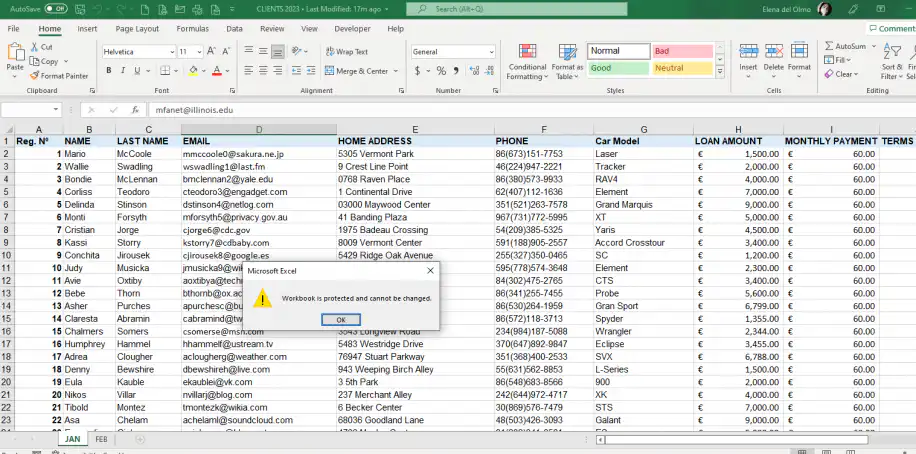
After applying this option, anyone can open your Excel document, but they can’t access its structural commands, including adding a sheet, changing the name, or deleting any existing sheets.
Protect specific cells in an Excel workbook from editing
To protect specific cells, you will need to protect the sheet. This is how to protect an Excel sheet from editing and copying specific cells.
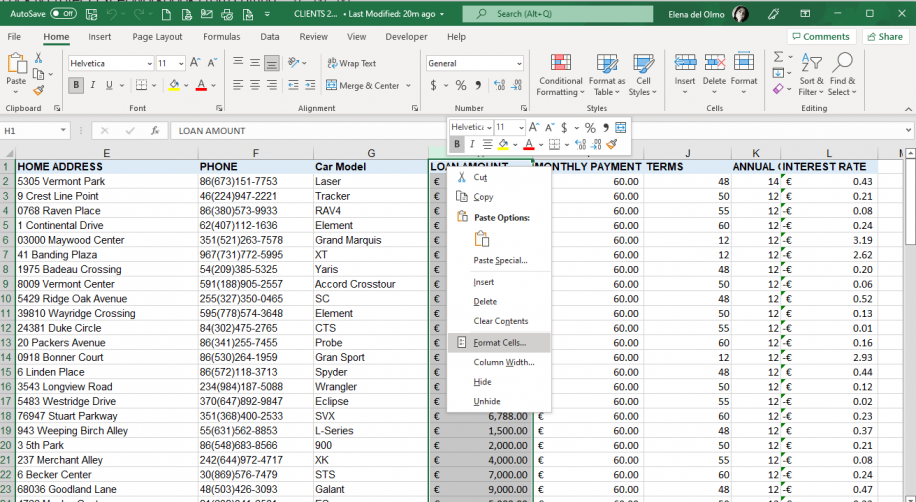
1. Select the cell range you want to lock from editing. Right-click on the selected range and then click on “Format Cells” from the drop-down menu.
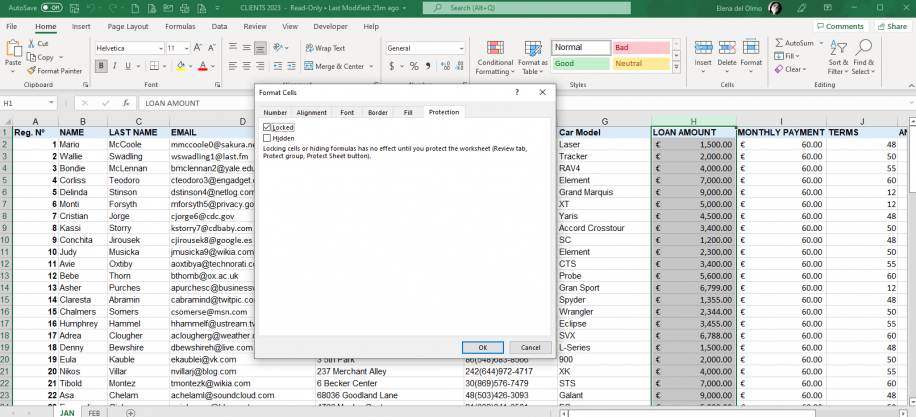
2. Go to the “Protection” tab and check the box next to the “Locked” option. As Microsoft warns you, you’ll need to protect the sheet so this has an effect. Click “OK” to proceed.
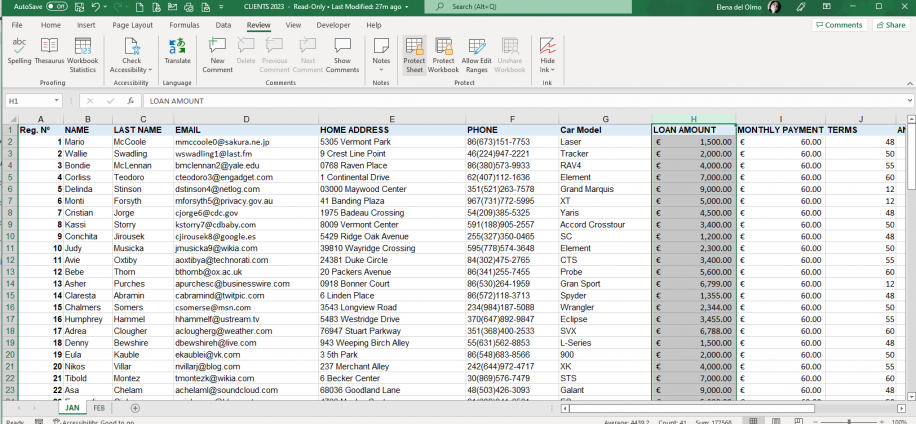
3. Go to the “Review” tab and click on “Protect Sheet”.
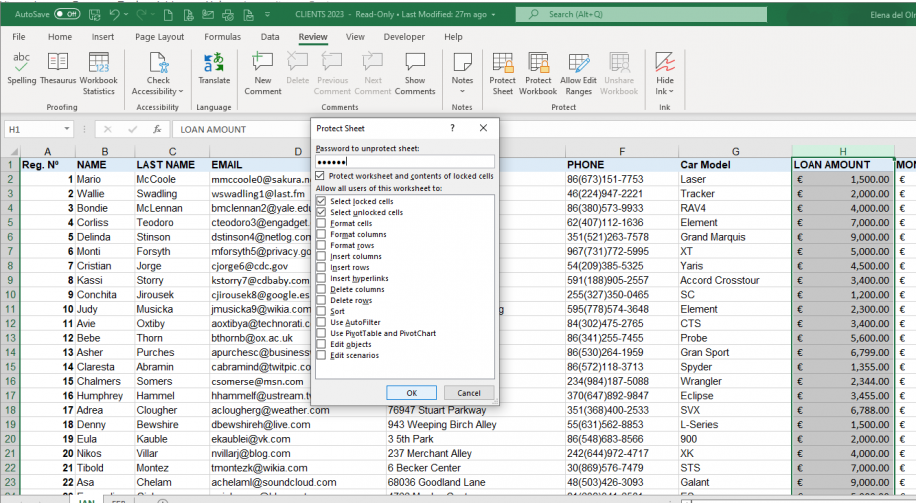
4. Enter the password and make sure the option “Protect worksheet and contents of locked cells” is enabled. Click “OK”.
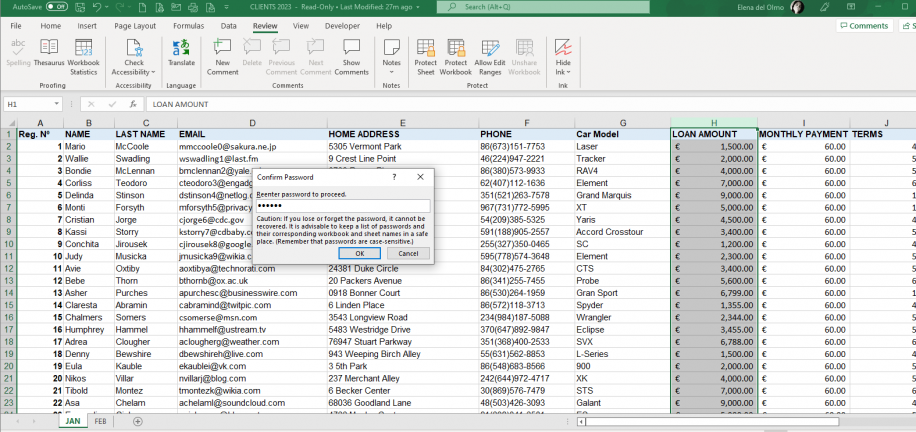
5. Re-enter the password to confirm and click “OK” to finish.
Conclusion
As users become more specialized in their use of spreadsheets, so do the features of these types of applications. Excel is used by many to store key information that may be linked to external sources using complex formulae. In these cases, an accidental edit to a sheet or cell can have major consequences. Thankfully, there are many ways to protect an Excel workbook.
You should now know how to protect your Excel workbook from editing using 5 different methods. For more in-depth information on Excel protection, take a look at our related blog posts:
- How to lock cells in Excel
- How to password-protect an Excel file?
- How to password-protect a Google Sheet?
- How to unlock cells in Excel?
- How to remove a password from Excel
If someone has already changed a file you meant to lock, you can restore a previous version of the Excel file. Working in Google Sheets instead? Here’s how to protect cells or pages in Google Sheets.



 English
 Español
 Português do Brasil
 Français