Get help

Help center

Guides and answers

Contact support

Write to our team

Sign in to

Workflows

Build processes with your team

Automations

Connect files and automate tasks

One system, four parts

AI agents

Virtual Employees that work 24/7

Automations

Connect files and automate tasks

Workflows

Build processes with your team

Data Space

Trusted data sharing and control

Solutions by department

Finance

Reports, budgets, and reconciliations

Inventory and manufacturing

Stock, orders, and production in one view

HR

Timesheets, attendance, and reviews

Project management

Status and workload across projects

Sales and CRM

Leads and deals kept up to date

Education

Student records and school data

Finance

Turn manual finance work into reports that update themselves.

What Finance teams automate

  • Track payables and receivables
  • Build cash flow statements
  • Compare budget against actuals

Inventory and manufacturing

See stock levels and automate ordering.

What inventory and manufacturing teams automate

  • Track inventory across multiple sites
  • Connect sales, purchasing, and warehouse data
  • Link a barcode scanner to your sheet

HR

Run recruitment, attendance, and OKR tracking from your sheets.

What HR teams automate

  • Track recruitment and onboarding
  • Record team OKRs and results
  • Track check-ins, check-outs, and leave

Project management

Assign tasks and track hours without manual updates.

What project teams automate

  • Assign tasks and track status changes
  • Estimate effort and log hours worked
  • Track milestones across projects

Sales and CRM

Track leads and sales performance with automated reports.

What sales teams automate

  • Track and convert leads
  • Set sales goals and track team metrics
  • Monitor sales KPIs on dashboards

Education

Automate attendance, grades, and school purchasing.

What schools automate

  • Track attendance and notify parents
  • Record and compare class grades
  • Track inventory lent to students and staff

Find a use case

By department

How each team uses Sheetgo

By industry

How each industry uses Sheetgo

By company size

Small, medium-sized, or large

Learn

Blog

Guides and product news

Customer stories

How teams like yours use Sheetgo

Help center

Guides and answers

Why Sheetgo

Compare

How Sheetgo compares with other tools

Security

How we protect your data

Trust center

Our compliance details

Sign in to

Workflows

Build processes with your team

Automations

Connect files and automate tasks

One system, four parts

AI agents

Virtual Employees that work 24/7

Automations

Connect files and automate tasks

Workflows

Build processes with your team

Data Space

Trusted data sharing and control

Solutions by department

Finance

Reports, budgets, and reconciliations

Inventory and manufacturing

Stock, orders, and production in one view

HR

Timesheets, attendance, and reviews

Project management

Status and workload across projects

Sales and CRM

Leads and deals kept up to date

Education

Student records and school data

Find a use case

By department

How each team uses Sheetgo

By industry

How each industry uses Sheetgo

By company size

Small, medium-sized, or large

Get started

Templates

Ready-made workflows to start from

Learn

Blog

Guides and product news

Customer stories

How teams like yours use Sheetgo

Help center

Guides and answers

Why Sheetgo

Compare

How Sheetgo compares with other tools

Security

How we protect your data

Trust center

Our compliance details

Help center

Guides and answers

Contact support

Write to our team

Workflows

Build processes with your team

Automations

Connect files and automate tasks

How to use the Google Sheets Salesforce connector

Salesforce is a powerful and complex platform. If you’re an administrator or employee that frequently needs to export and import large amounts of data, you already know that this can get very tricky. While it is possible to set up a complex structure of roles and permissions, or even configure access for specific apps, this is not something you get done in an afternoon or two. Additionally, if you need to further analyze or manipulate data, a spreadsheet environment is more appropriate.

Fortunately, the Google Sheets Salesforce Connector add-on allows you to easily move data between Salesforce and your Google Sheets. In this article, you will learn about the Salesforce Connector and its limitations, as well as how to use it to perform a variety of data-related tasks.

Can you connect Google Sheets to Salesforce?

You can connect your Google Sheets to Salesforce by installing Google’s Salesforce Connector add-on. In Google Sheets, the add-on’s sidebar is called Data connector for Salesforce. You can quickly and easily access reports, as well as import, update, and refresh data. You can even schedule automatic updates. However, there are some limitations you need to know about.

Limitations of the Salesforce connector add-on

To use the Connector add-on, you need to have one of the following editions of Salesforce:

  • Enterprise
  • Performance
  • Unlimited
  • Developer

If you have a Professional Edition of Salesforce, you can request that API access be enabled as a new paid service. To check which edition you have, go to your Salesforce account settings. Also, consider that there could be limitations regarding the amount of data calls you can make per day.

How to use the Salesforce connector for Google Sheets?

Installing an add-on nowadays is fairly easy. To unlock the full potential of the Salesforce Connector add-on, you’ll find step-by-step instructions on how to install the add-on, connect to Salesforce, access the reports, import data, update it, and finally, refresh it.

Install the Salesforce connector add-on

Follow the steps below to install the add-on.

1. In Google Sheets, go to Extensions > Add-ons > Get add-ons.
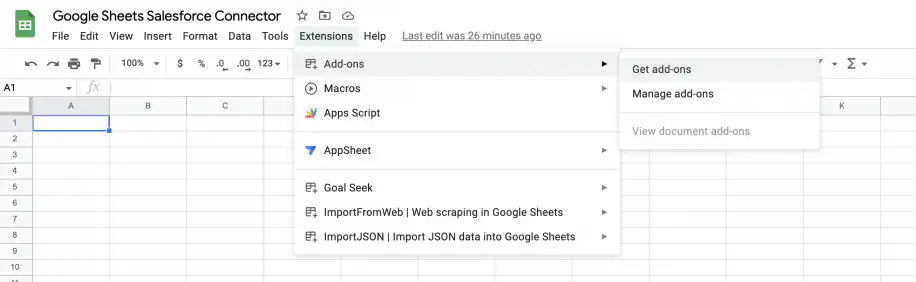
Salesforce connector Google Sheets — Extensions menu open with Add-ons and Get add-ons highlighted

2. Search for Salesforce Connector in the Google Workspace Marketplace and click on Salesforce Connector Google LLC to access the installation window.
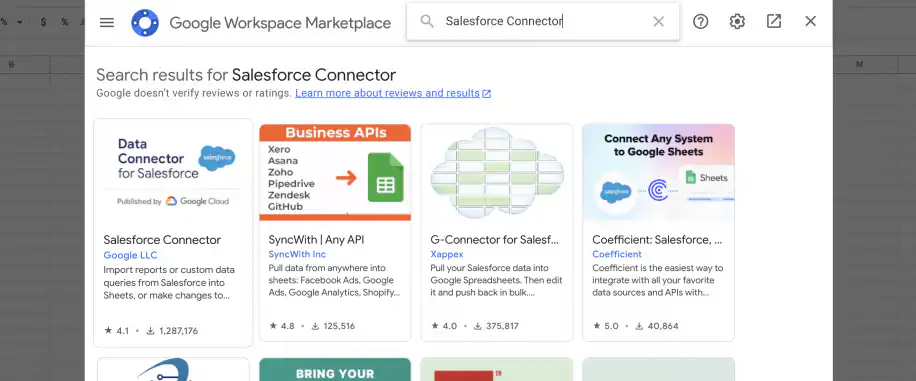
Salesforce connector Google Sheets — Google Workspace Marketplace search results for Salesforce Connector

3. Click on “Install” and then “Continue”.
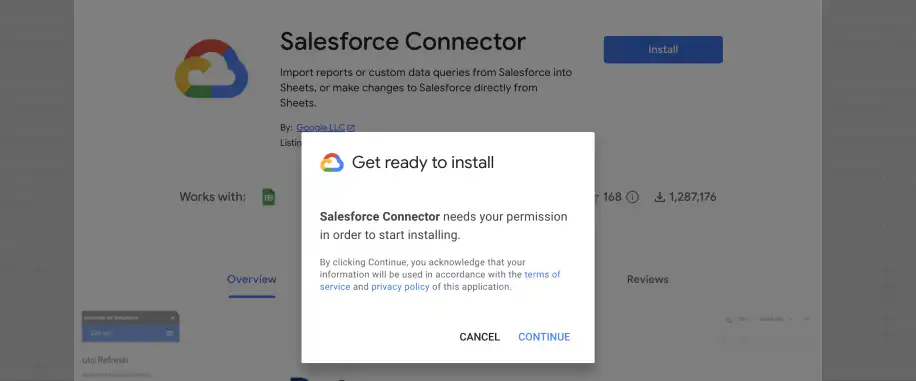
Salesforce connector Google Sheets — Get ready to install dialog with the Continue button

4. Select “Allow” so the add-on can access your account.
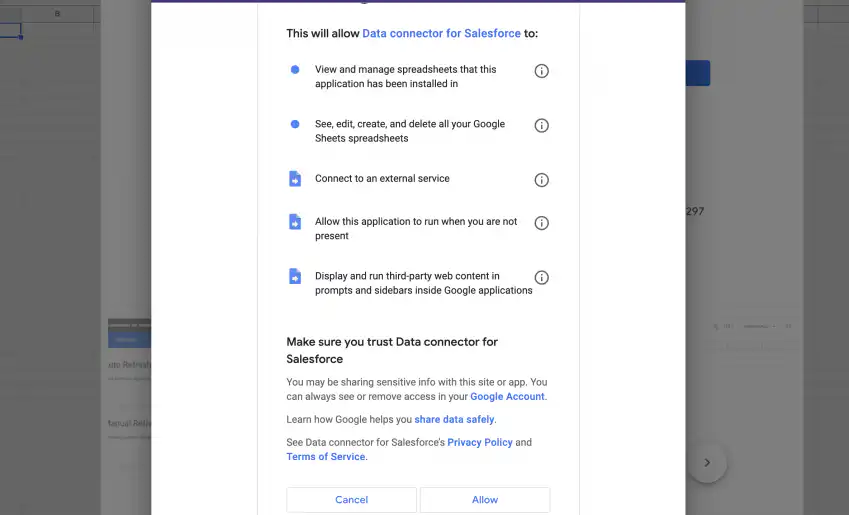
Salesforce connector Google Sheets — permissions requested by Data connector for Salesforce with the Allow button

Connect to Salesforce

Once you have installed the add-on, connect to your Salesforce account to fully allow access. Follow the steps below to connect to Salesforce.

1. Go to Extensions > Salesforce Connector > Open.
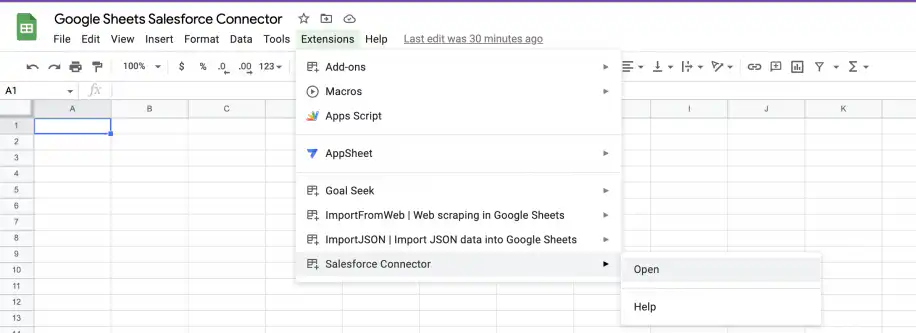
Salesforce connector Google Sheets — Extensions menu with Salesforce Connector and Open selected

2. In the sidebar, choose whether you want to connect to a “Sandbox” or “Production” site, then click “Authorize”.
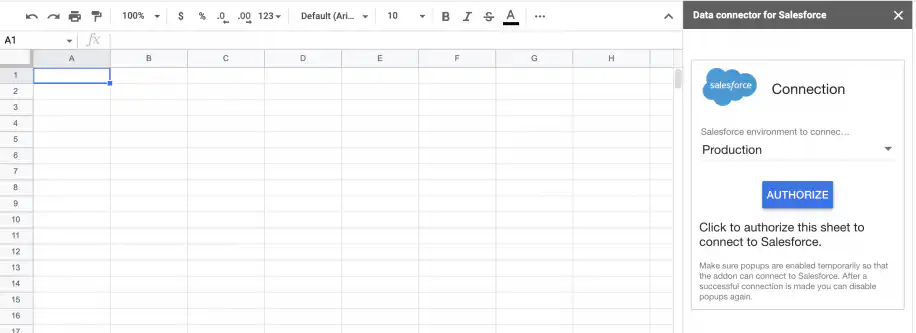
Salesforce connector Google Sheets — sidebar with the Production environment and the Authorize button

3. Fill in your Salesforce account information and click on “Allow”.
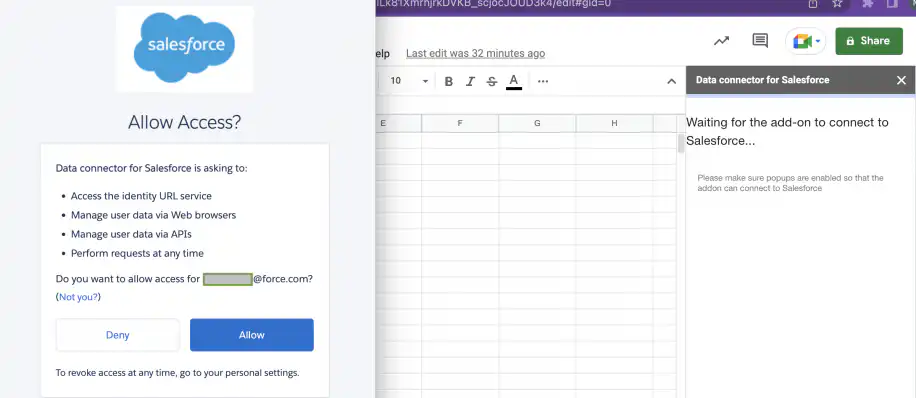
Salesforce connector Google Sheets — Salesforce Allow Access screen next to the add-on sidebar

4. You can now see the options in the sidebar: “Reports”, “Import”, “Update”, “Delete”, and “Refresh”.
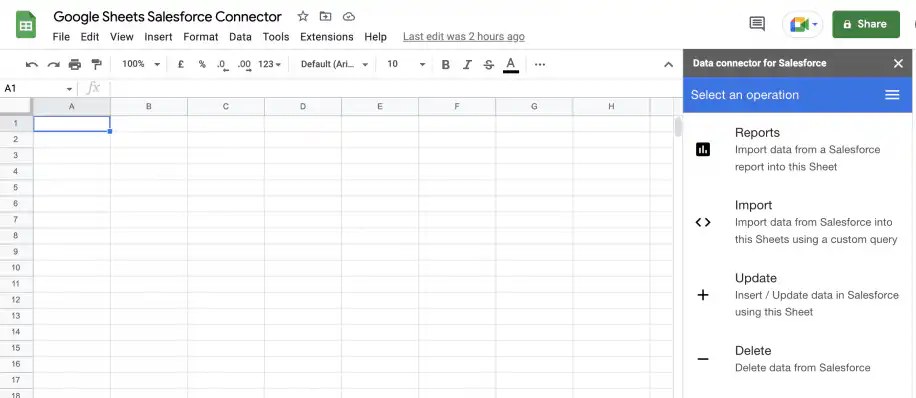
Salesforce connector Google Sheets — Select an operation pane with Reports, Import, Update and Delete

Access reports

To access your Salesforce reports, click on “Reports” from the sidebar. Follow the steps below to import a report to your Google Sheets.

1. In the sidebar, click on “Reports”. First, you need to select the source report, “Choose a recently run report” or “Search all reports”. Then, select where to import that report, “Import to active sheet” or “Import to new sheet”. Once all options are selected, click on “Get Data” to import.
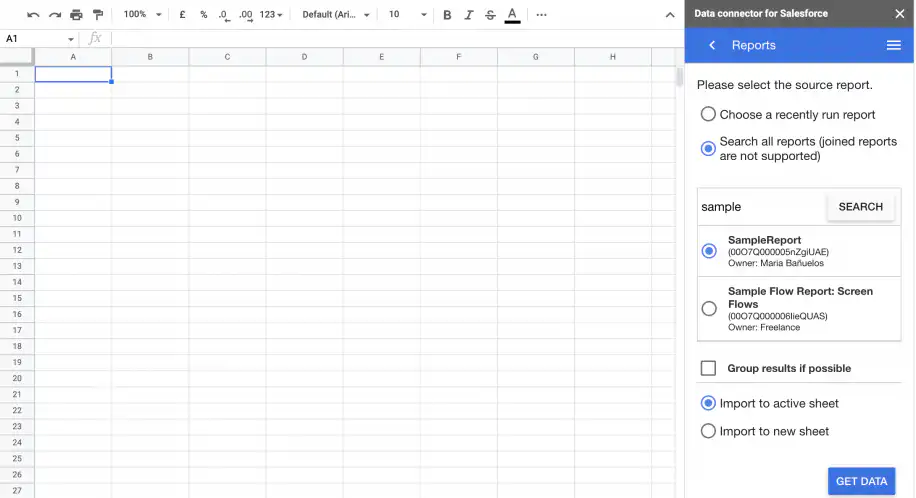
Salesforce connector Google Sheets — Reports pane with Search all reports and SampleReport selected

2. Your Google Sheets should now show your imported report.
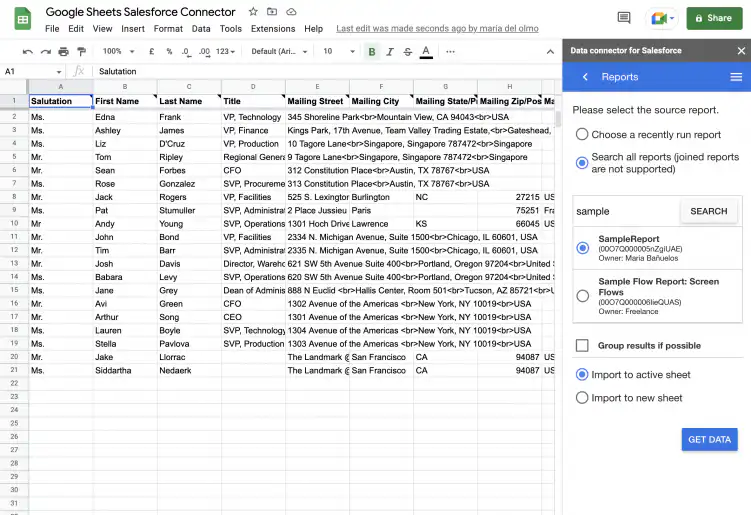
Salesforce to Google Sheets — SampleReport contacts imported into the active sheet

Import data

You can import data objects directly from Salesforce, not just reports. Follow these steps to import your data.

1. Click “Import” in the “Select an operation” pane, previously shown.

2. In “Select source objects,” select the table to import, and then click “Next.” Here, select the “Account” table.
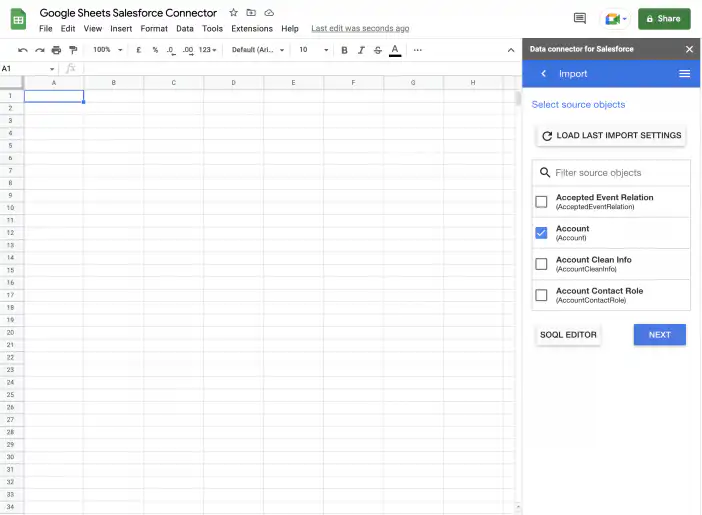
Salesforce connector Google Sheets — Import pane with the Account object selected

3. You can select as many tables as needed. Once you do, click “Next.”
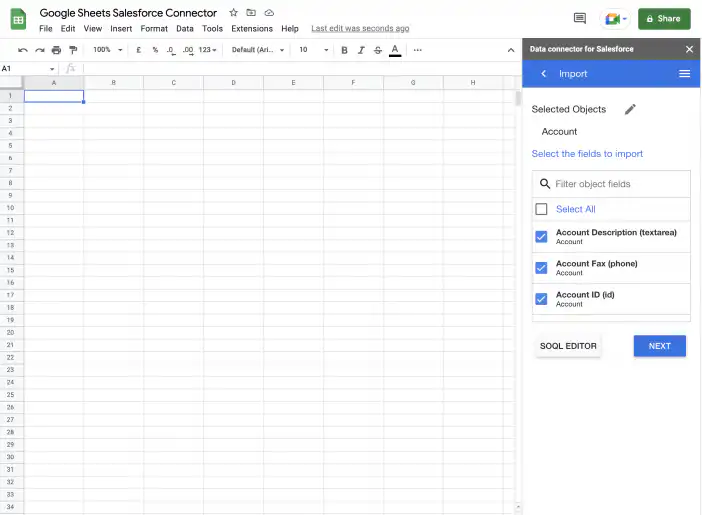
Salesforce connector Google Sheets — Account fields checked in the Select the fields to import list

4. You can choose to filter your data before importing. If you only need to import specific accounts, you can filter by any of the existing fields. Click on “Get Data” in the bottom-right corner of the sidebar.
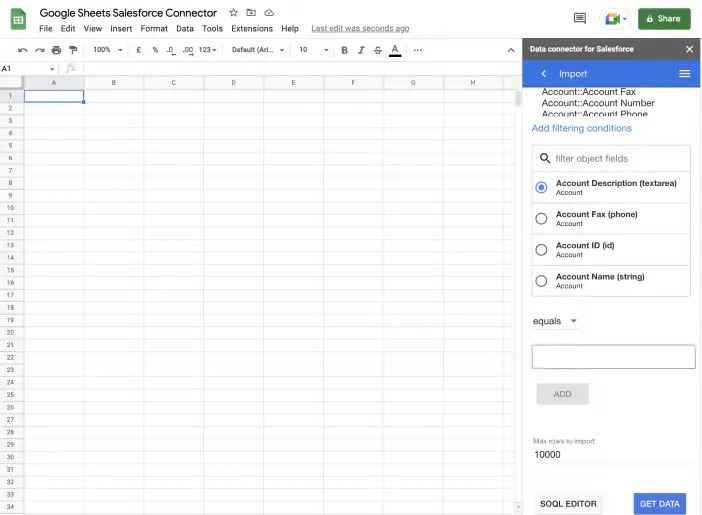
Salesforce connector Google Sheets — Add filtering conditions with Max rows to import set to 10000

5. You should now be able to view the selected tables in your Google Sheets.
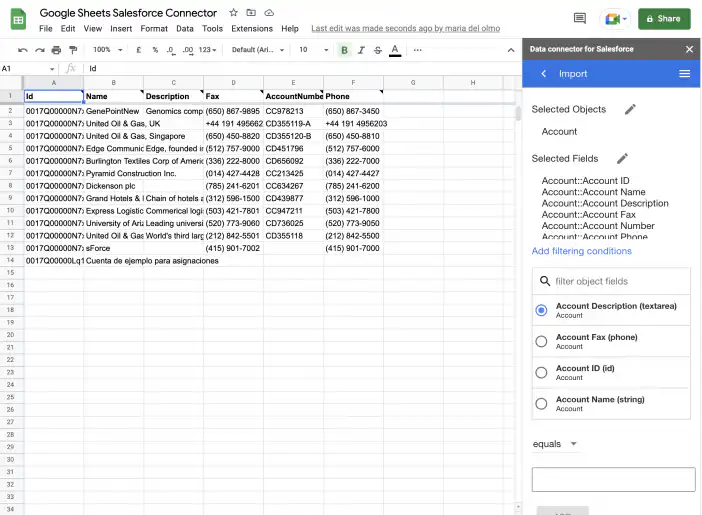
Salesforce to Google Sheets — Account records imported with Id, Name, Description, Fax and Phone columns

Update data

Once you have imported the data, you can choose to “Update” or “Delete” data. Follow the steps below to update your data.

1. Click on the cell you want to update and choose the object type from the sidebar. Here, I will be updating the “AccountNumber” field for “sForce,” i.e., cell E13.
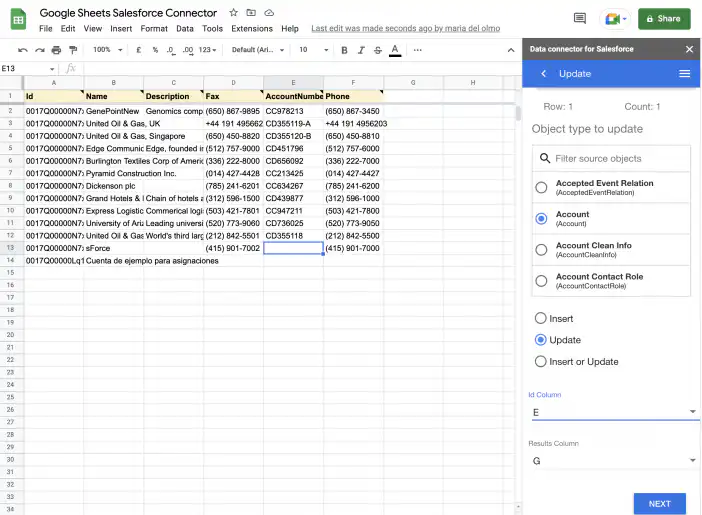
Salesforce connector Google Sheets — Update pane with Account and Update selected, Id column E

2. Type in the new data and click on “Refresh the selected range” in the top right corner.
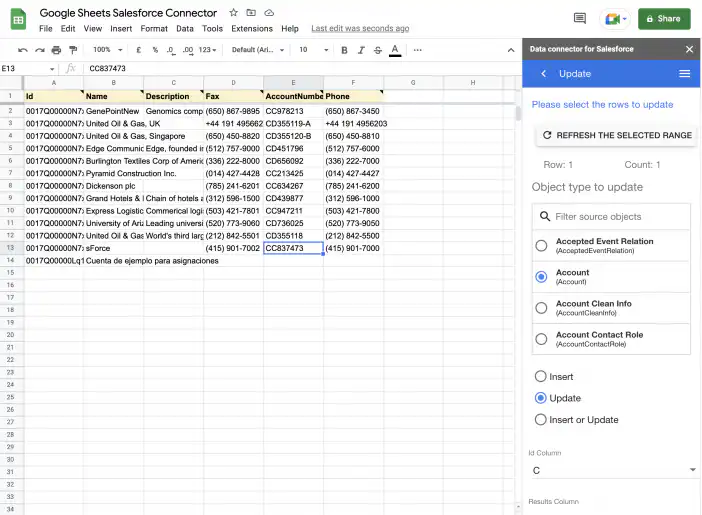
Salesforce connector Google Sheets — new account number in cell E13 and Refresh the selected range

3. Once you have refreshed the range, scroll down in the sidebar and choose the method you want to use: “Insert,” “Update,” “Insert or Update.” Then, select the column containing the updated information in “Id column.” By default, the “Results Column” shows the first empty column after the table. Click “Next.”
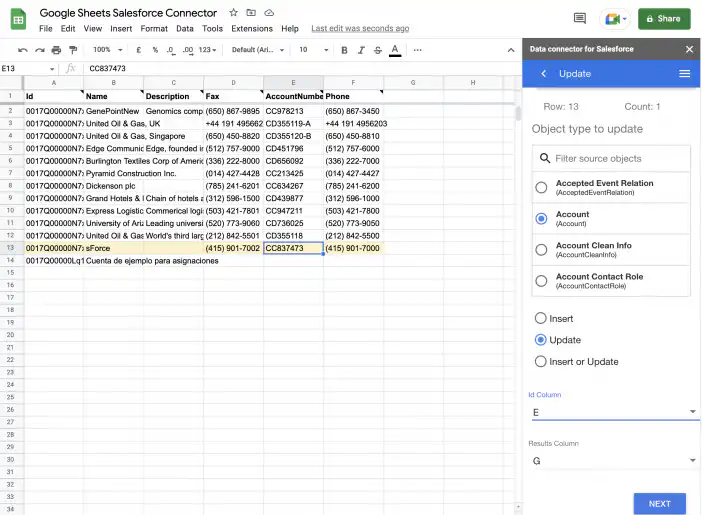
Salesforce connector Google Sheets — row 13 selected for update with the Next button

4. Finally, make sure that the fields are mapped. If you imported the table directly from Salesforce, click the “Select All” option and then “Execute.” You will be asked to confirm the update.
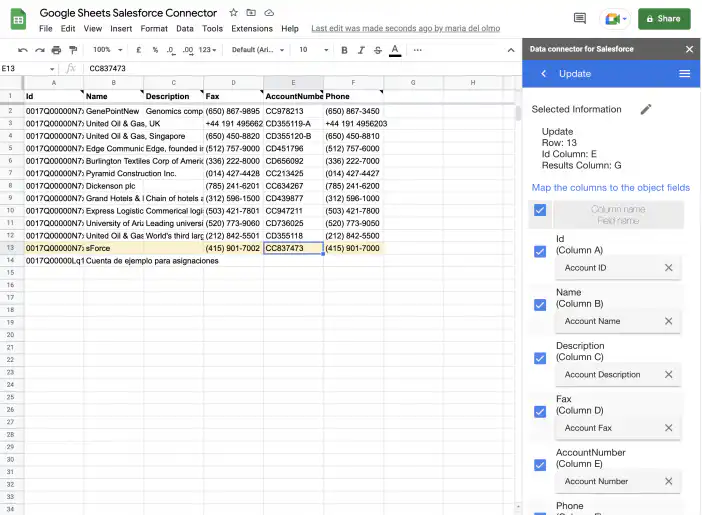
Salesforce connector Google Sheets — sheet columns mapped to Account fields

5. You should see your data updated through a confirmation message, as shown below.
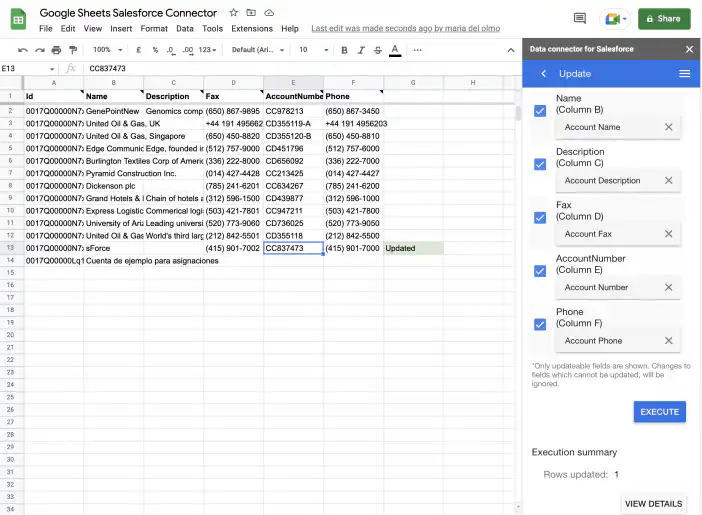
Salesforce connector Google Sheets — Updated in the results column and Rows updated: 1

6. If you go to the Salesforce site, you should see that the account number has been updated for “sForce.”
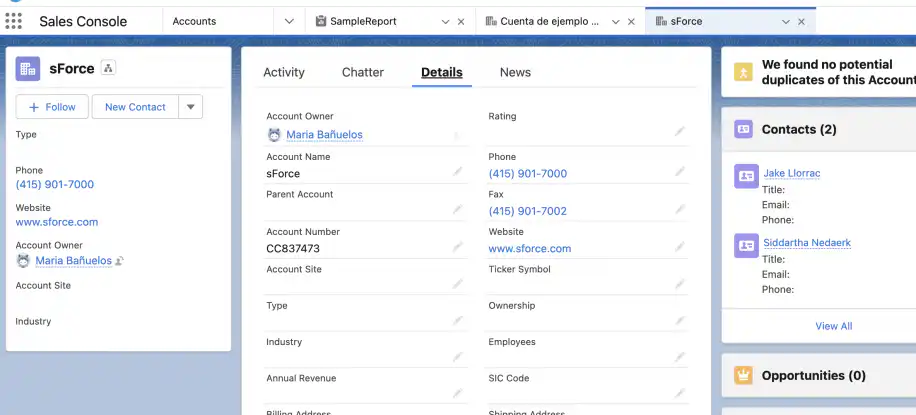
Salesforce connector Google Sheets — sForce account in Salesforce with account number CC837473

Refresh data

You can refresh your data manually or schedule how often you want to refresh it automatically.

1. Click on “Refresh” in the sidebar to see the options.
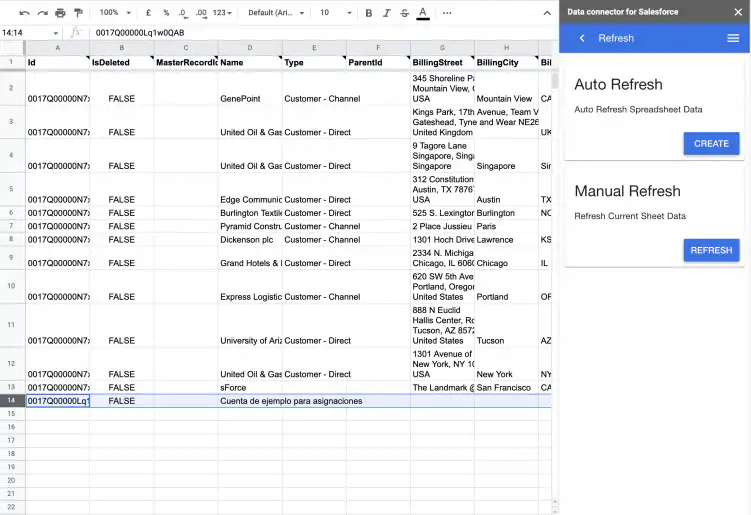
Salesforce connector Google Sheets — Refresh pane with Auto Refresh and Manual Refresh

2. Click on “Manual Refresh” to instantly refresh your data. You should receive a confirmation message stating, “The data has been refreshed.”
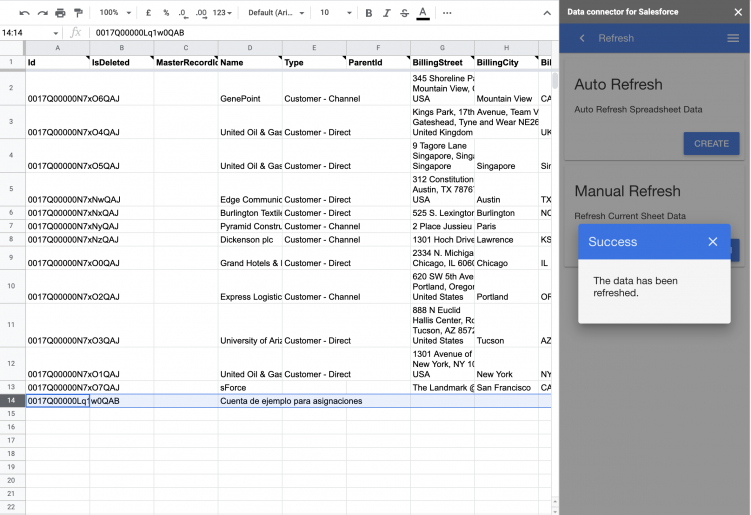
Salesforce connector Google Sheets — Success message: The data has been refreshed

3. Click on “Auto Refresh” to choose the frequency with which you’d like to refresh your data automatically.
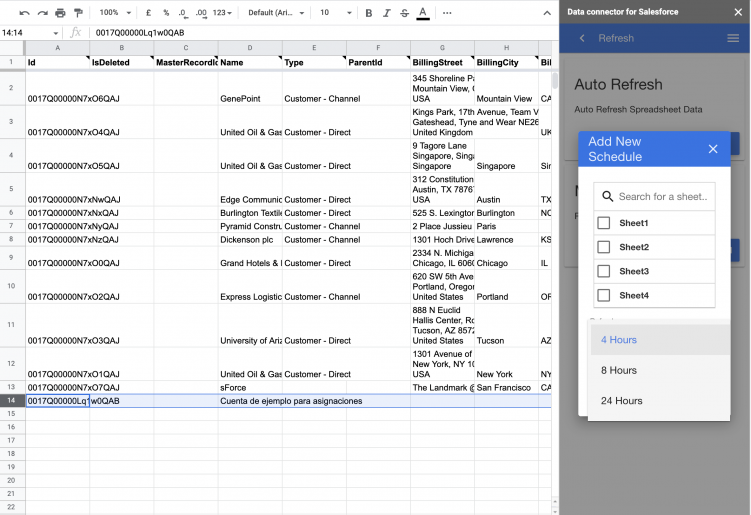
Salesforce connector Google Sheets — Add New Schedule with sheets and 4, 8 or 24 hours options

Conclusion

Although Salesforce is a versatile and powerful platform in itself, when you need to manipulate large amounts of data, you want something more user-friendly. The Salesforce Connector allows you to manipulate your Salesforce data directly from Google Sheets.

You now know how to install the Salesforce Connector add-on in Google Sheets, connect to your account, and access reports. You also know how to import your Salesforce data and update it, as well as how to schedule when your data is refreshed in case you want to do it automatically.

Once your Salesforce data is in Google Sheets, you can summarize it with a pivot table or build a sales report in Google Sheets. To share that data with other spreadsheets, see how to connect Google Sheets automatically. If your team spends hours keeping CRM data and sales spreadsheets in sync, Sheetgo’s AI sales virtual employee can take over that work.

You may also like…

google sheets features and formulas

Top 5 dynamic array formulas in Google Sheets 

Google Sheets has evolved beyond basic spreadsheets. With the introduction of dynamic array formulas, users can now manipulate and analyze...
google sheets features and formulas

Mastering the FILTER Formula: 4 Use Cases with Examples

The FILTER formula in Google Sheets is a versatile tool for extracting data that meets specific conditions. Unlike the QUERY formula,...
google sheets features and formulas

Unlocking the Power of SUMIF and SUMIFS in Google Sheets: 4 real-life use cases

The SUMIF and SUMIFS formulas in Google Sheets are indispensable tools for performing conditional summations. They simplify complex...