
Sometimes it makes sense to segregate information into smaller, organized chunks. Just as we organize our pages in a notebook using appropriately named tabs to identify their purpose quickly. Similarly, in Google Sheets, we can work with data in multiple sheets within the same spreadsheet file. This way, it is easier to manage the data. In this article, we will explore how to work with multiple sheets.
Introduction to sheets
A sheet is analogous to a page in a notebook. Just like there can be multiple pages in a notebook, there can be multiple pages in Google Sheets. However, by default, every Google Sheets file contains at least one worksheet. Because what’s the purpose of a notebook without a single page in it?
At the very bottom of the Google Sheets application user interface, we will notice the available sheet tab(s). At the moment, we see there’s only one sheet named Sheet1.
Renaming and adding more sheets
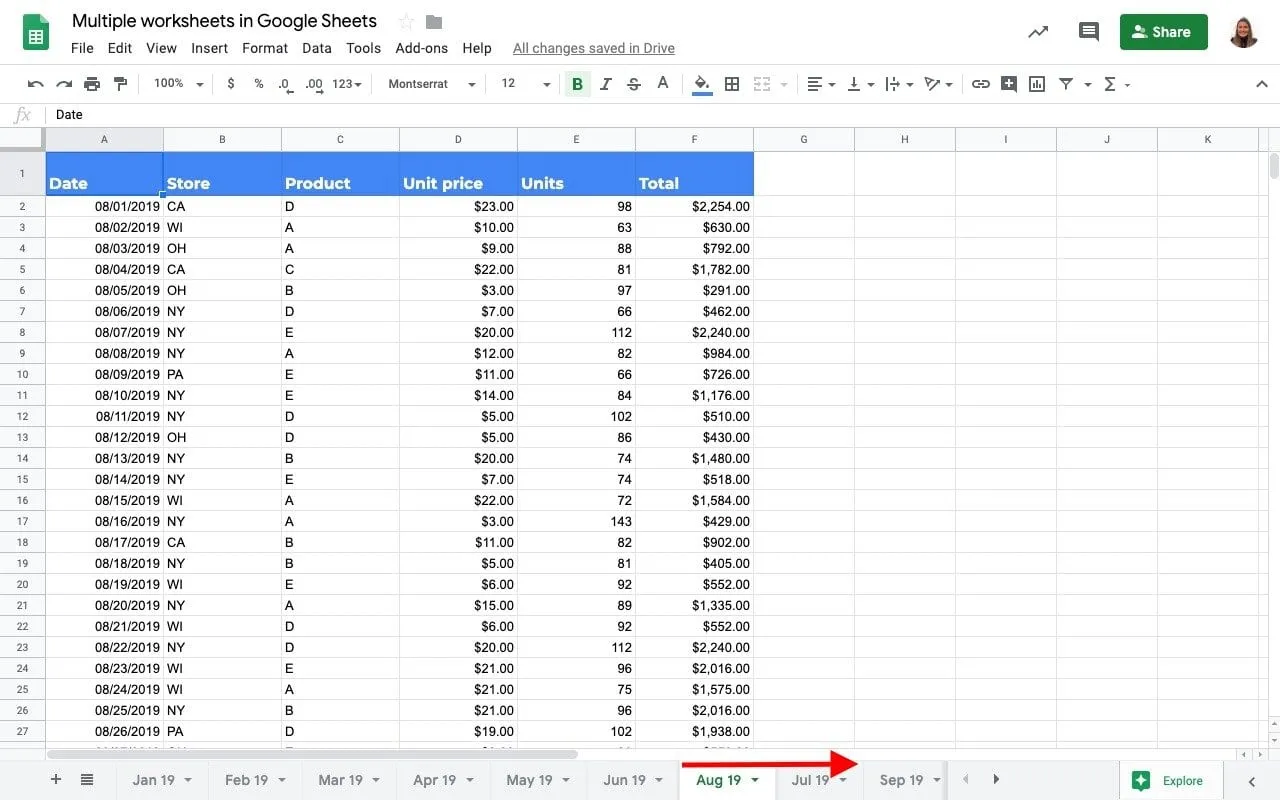
We can change the name of the sheet by double-clicking on the tab, then keying in the name of our choice. Once done, hit Enter/Return or click away. Alternatively, right-click on the tab and then choose the Rename option. To add more worksheets, click the + option at the bottom left corner. A good case of a Google Sheets file with multiple sheets that are renamed is below. It is a spreadsheet that contains monthly sales data, segregated into multiple worksheets, each appropriately named for its purpose.

Navigation (Mouse)
To activate a different sheet, click on its tab. However, there may be scenarios where there are more sheets than the UI can display simultaneously. For example, in the screenshot above, the Jan 18 sheet isn’t visible, although we know it is there. In such cases, Google Sheets lets us horizontally scroll through the list of available worksheet tabs. Notice the left-and right-triangular arrow buttons adjacent to the rightmost worksheet tab? They weren’t there when in the first screenshot. They automatically appear as the number of sheets in the file increases. Use those buttons to move left or right and, accordingly, uncover the sheets we need.
If that seems a little tedious to click multiple times, there’s an easier way. Use the Ctrl button in combination with those triangular buttons to quickly view the first/last worksheet. Alternatively, click on the “All sheets” option (the one that resembles four stacked thick lines) at the bottom left corner. It displays the list of available sheet names, and the active worksheet has a check mark next to it. To activate another sheet, just click on the corresponding name in the sheet list.
Navigation (Keyboard)
While the mouse is a great tool, some of us prefer to use keyboard shortcuts for their ease of use and speed. Below are the key combinations that let us toggle between the sheets.
- Activate the next sheet:
- Windows: Ctrl + Shift + Pg Down
- Mac: Cmd + Shift + Fn + ↓
- Activate the previous sheet
- Windows: Ctrl + Shift + Pg Up
- Mac: Cmd + Shift + Fn + ↑
Now let’s say you need to toggle between sheets that are far away from each other (Jan 18 and Sep 18, for example). Using the above keyboard combinations for this purpose isn’t any good. And at times like these, we may even long for the good old Alt + Tab keyboard combination that easily toggles between windows. While that isn’t directly helpful here, we can use it to our advantage with a simple hack. We just have to open the same Google Sheets file in a new window and select the sheet of our interest. Now we can just do Alt + Tab to switch between these two sheets even if they are not close to each other. Read more about Google Sheets keyboard shortcuts in our Keyboard Shortcuts Guide.
Reorganize sheets
At times, we may have the order of the sheets not to our liking. In that case, we can quickly rearrange them in any order that we prefer. We may use the mouse, hover over the worksheet tab, click and drag it to the position where we deem it fit, and release the mouse. The worksheet of interest now snugly fits into the place we chose for it.
Another alternative is to right-click on the sheet tab, then choose the Move left/Move right option, whichever is applicable. But if we need to move the sheet a long way left or right, the mouse click-drag method is faster.
Cell references become explicit
If we were to create some formulas on the worksheet that reference the same worksheet, it would be pretty straightforward. Something like SUM(F2

In cell G2, we calculate the SUM of the range of cells within the same worksheet. But in cell G3, we are calculating the SUM of the cell range that is on the Jul 18 worksheet.
Miscellaneous
- Every sheet is supposed to have a unique name, and a sheet can’t be without a name.
- We can add up to 200 sheets per Google Sheets file.
- Each worksheet in the file will have an equal amount of real estate to work with.
- Unlike Excel, we can’t group sheets to work on them in one shot. On similar lines, Google Sheets doesn’t support 3D formula referencing.
Work with tabs/sheets
And there you go! This is how you work with tabs/sheets in Google Sheets.
If you’d like to learn more about the various features of Google Sheets, why not take a look at our blog post on How to color Google Sheets tabs.

