


When we think of Google Sheets, we mainly imagine inputting lots of numbers or words into each cell. But did you know that you can input images inside a cell too? At first, this may seem like a confusing thing to do, but it can actually be extremely useful in a variety of situations. Being able to insert an image into a cell in Google Sheets means that you can combine multiple formats in one spreadsheet, offering a more visual representation of our data.
Let’s explore in more detail why inserting an image into a cell can be useful for your business, and how you can do this in just a few steps!


Why insert an image into Google Sheets?
Inserting images can help to identify rows of data quickly, offer visual insights, or simply so you have everything in one single file. There are several occasions where it might be useful to embed an image into your Google Sheets file.
Here are just a few examples:
- Add product image or label to your inventory/stock list
- Insert a photo of your team members or students
- Add your company logo and designs to create branded files to share with clients and customers
- Upload an image of a receipt to your expenses/invoices spreadsheet
- Add images to your social media scheduling spreadsheet
- Create dynamic dashboards with designs and images
Now that we understand the many ways inserting images into cells can change the way we manage our data, let’s go through a step-by-step of how to insert images into a cell in Google Sheets.
How to insert an image into a Google Sheets cell
Let’s say I am creating a spreadsheet that’s ready to share both internally and externally. I want to add the company logo to the corner of the spreadsheet, along with other company details.
This means that whoever I share it with will be able to quickly identify the Google Sheet, and will be able to keep this file with other files by my company.
There are two main ways we can insert images into a cell in Google Sheets:
- L'utilisation de la IMAGE function
- Using the Insert feature
Let’s explore both options and their benefits in more detail.
1. Google Sheets IMAGE function
What is the IMAGE function?
The IMAGE function in Google Sheets allows you to insert an image directly into a cell by embedding the image’s URL.
Syntaxe
- url: The link or URL of the image. To get the URL, right click on the image and select Copy image address. This must include the internet protocol (http or https), and must be enclosed in double-quotes(“) if entered as text. It can also be a reference to a cell that holds the URL.
- mode: OPTIONAL – is 1 by default. This specifies how the image is sized within the cell. Below are the four different modes, which Google Sheets uses to render the image in the cell.
1 – resizes the image so that it fits inside the cell while maintaining aspect ratio.
2 – stretches or compresses the image to fit inside the cell, while ignoring aspect ratio.
3 – leaves the image in its original size, which may result in cropping.
4 – lets the user define custom size specifications. - hauteur: OPTIONAL – can only be used if mode is 4. This parameter allows you to determine how tall an image should be within a cell.
- largeur: OPTIONAL – can only be used if mode is 4. This parameter allows you to determine how wide an image should be within a cell.
A noter : If you try to add the height and width parameters when the mode is not 4, the formula will return an #N/A! error.
Why use the IMAGE function in Google Sheets?
The IMAGE function allows you to directly insert an image from the internet into a cell within your spreadsheet.
Using this formula also offers a couple of advantages over the Insérer feature:
- Control the way the image looks: The IMAGE formula offers a range of options to adjust how your image looks to suit your needs.
- Combine with other functions: You can combine the IMAGE formula with other formulas such as the VLOOKUP, in order to create an interactive spreadsheet with a dropdown menu and images that change accordingly.
- Automatically update your images: Updating or replacing your images is easy – just change the URL in the formula and Google Sheets will automatically update your image.
The IMAGE function is a great option to use when the images you require are on a public domain/from the internet. You cannot, however, insert a URL from My Drive.
How to insert an image inside a cell using the IMAGE function
Using the use case mentioned above, let’s add the company logo to the following spreadsheet so it’s ready to share within and outside of my organization.

Step 1: Copy image address
Navigate to the web page where your chosen image is located. Hover over the image, right-click, and select Copy image address.
My chosen image URL looks like this:
https://static.sheetgo.com/wp-content/uploads/2020/05/sheetgo-logo-20200521.svg
Step 2: Determine your parameters in formula
Now that you have the URL for the IMAGE formula, you can change aspects of the formula to control the way the image looks. For the default result (where the image fits within the cell and maintains aspect ratio), your formula will look like this:
Simply click on the cell where you want your image to be located, and paste your formula.
The result should look something like this:

To understand what the other modes may look like, here’s a spreadsheet demonstrating the different modes of the parameters and the syntax used for each.

2. Google Sheets Insert feature
What is the Insert feature?
Le Insérer feature in Google Sheets allows you to directly insert an image into a cell from your own resources of images.
It also offers other options such as adding the URL of an online image, inserting an image from your Google Drive and even inserting an image directly captured through your camera.
There are two ways you can insert an image using the Insérer feature:
- Image in cell: Inserts the image directly into the cell. If you move or resize the cells, the image will also adjust to fit.
- Image over cell: Inserts the image over the cell. The image will stay the same shape and in the same place regardless of how you adjust the cells around it.
A noter : You can only add one image to a single cell.
Why use the Insert feature in Google Sheets?
This feature gives you two ways to insert images from your computer directly into your spreadsheet.
Le Insérer feature offers additional benefits that the IMAGE function does not:
- Insert personal images: Insert private images such as receipts to create important spreadsheet files.
- Easily adjustable: Whenever you insert an image in a cell, Google Sheets will automatically adjust the image to fit the cell whenever you move or change its size.
- Insert URL: The Insert feature allows you to insert a URL to add images from the internet directly to your file.
- Add Google Drive images: Easily insert images within your Google Drive to your spreadsheet cells.
- Assign a script to an image: If you’re an advanced user, you can assign a script to an image. The script is triggered when you click on the image.
How to insert an image inside a cell using the Insert feature in Google Sheets
Let’s use the same use case again to demonstrate how the Insérer feature can be used to successfully add your images inside a spreadsheet cell.
Step 1: Choose insert mode
Click on the cell you want to insert your image into. Navigate to Insérer > Image and choose between Insert in cell ou Insert over cells.
For this example, let’s choose Image over cells.

Step 2: Choose image source
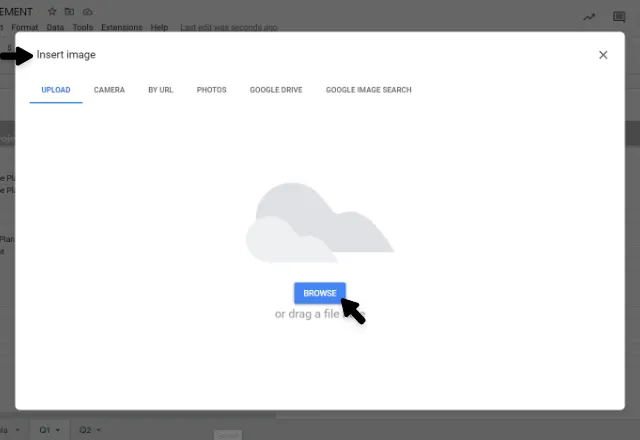
Computer file
Le Insérer feature offers a variety of sources where you can choose your image from. To upload an image from your personal computer files, make sure you’re on the Upload tab, and click Browse.
Your computer files should open and you can search for your image. Select the image and press Ouvrir.
Google Drive
You can also insert an image from your Google Drive. To do this, make sure you’re on the Google Drive tab. Search for your image.
Once you’ve found it, select the image and press Insérer.

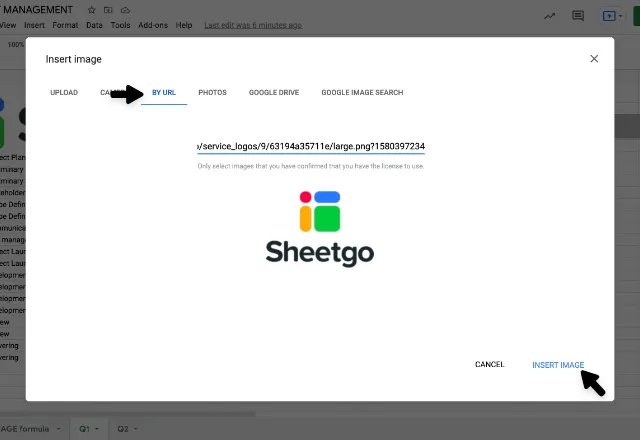
URL
If you’d like to add an image from the internet, simply select the URL tab and paste the Image address into the field.
Une fois l'opération terminée, cliquez sur Insert image.
All ways should successfully insert your image over the cells like this:

Add an image to Google Sheets
And there you have it! Inserting an image into your Google Sheets is easy with any option you choose.
To discover more ways to make the most of the various features and functions available in Google Sheets, why not take a look at our blog posts on How to find and replace in Google Sheets ou Comment geler des lignes et des colonnes dans Google Sheets ?
Alternatively, browse our range of related posts below!
Note de la rédaction: Il s'agit d'une version révisée d'un article précédent qui a été mis à jour pour plus de précision et d'exhaustivité.

 English
 Español
 Português do Brasil
 Français