Obter ajuda

Central de ajuda

Guias e respostas

Entre em contato com o suporte

Escrever para nossa equipe

Entrar no

Workflows

Criar processos com sua equipe

Automations

Conectar arquivos e automatizar tarefas

Um sistema, quatro partes

Agentes de IA

Funcionários virtuais que trabalham 24/7

Automations

Conectar arquivos e automatizar tarefas

Workflows

Criar processos com sua equipe

Data Space

Compartilhamento e controle de dados confiáveis

Soluções por departamento

Finanças

Relatórios, orçamentos e conciliações

Estoque e manufatura

Estoque, pedidos e produção em uma só visão

RH

Folhas de ponto, presença e avaliações

Gestão de projetos

Status e carga de trabalho entre projetos

Vendas e CRM

Leads e negócios sempre atualizados

Educação

Registros de alunos e dados da escola

Finanças

Transforme o trabalho financeiro manual em relatórios que se atualizam sozinhos.

O que as equipes de Finanças automatizam

  • Acompanhar contas a pagar e a receber
  • Criar demonstrações de fluxo de caixa
  • Comparar orçamento e realizado

Estoque e manufatura

Veja os níveis de estoque e automatize os pedidos.

O que as equipes de estoque e manufatura automatizam

  • Acompanhar o estoque em vários locais
  • Conectar dados de vendas, compras e armazém
  • Vincular um leitor de código de barras à sua planilha

RH

Gerencie recrutamento, presença e acompanhamento de OKRs a partir das suas planilhas.

O que as equipes de RH automatizam

  • Acompanhar recrutamento e integração
  • Registrar OKRs e resultados da equipe
  • Acompanhar entradas, saídas e licenças

Gestão de projetos

Atribua tarefas e acompanhe horas sem atualizações manuais.

O que as equipes de projetos automatizam

  • Atribuir tarefas e acompanhar mudanças de status
  • Estimar o esforço e registrar as horas trabalhadas
  • Acompanhar marcos entre projetos

Vendas e CRM

Acompanhe leads e desempenho de vendas com relatórios automáticos.

O que as equipes de vendas automatizam

  • Acompanhar e converter leads
  • Definir metas de vendas e acompanhar métricas da equipe
  • Monitorar KPIs de vendas em painéis

Educação

Automatize presença, notas e compras da escola.

O que as escolas automatizam

  • Acompanhar a presença e avisar os pais
  • Registrar e comparar as notas das turmas
  • Acompanhar o estoque emprestado a alunos e funcionários

Encontrar um caso de uso

Por departamento

Como cada equipe usa a Sheetgo

Por setor

Como cada setor usa a Sheetgo

Por tamanho da empresa

Pequena, média ou grande

Aprender

Blog

Guias e novidades do produto

Histórias de clientes

Como equipes como a sua usam a Sheetgo

Central de ajuda

Guias e respostas

Por que a Sheetgo

Comparar

Como a Sheetgo se compara a outras ferramentas

Segurança

Como protegemos seus dados

Centro de confiança

Detalhes da nossa conformidade

Entrar no

Workflows

Criar processos com sua equipe

Automations

Conectar arquivos e automatizar tarefas

Um sistema, quatro partes

Agentes de IA

Funcionários virtuais que trabalham 24/7

Automations

Conectar arquivos e automatizar tarefas

Workflows

Criar processos com sua equipe

Data Space

Compartilhamento e controle de dados confiáveis

Soluções por departamento

Finanças

Relatórios, orçamentos e conciliações

Estoque e manufatura

Estoque, pedidos e produção em uma só visão

RH

Folhas de ponto, presença e avaliações

Gestão de projetos

Status e carga de trabalho entre projetos

Vendas e CRM

Leads e negócios sempre atualizados

Educação

Registros de alunos e dados da escola

Encontrar um caso de uso

Por departamento

Como cada equipe usa a Sheetgo

Por setor

Como cada setor usa a Sheetgo

Por tamanho da empresa

Pequena, média ou grande

Comece a usar

Modelos

Fluxos de trabalho prontos para usar

Aprender

Blog

Guias e novidades do produto

Histórias de clientes

Como equipes como a sua usam a Sheetgo

Central de ajuda

Guias e respostas

Por que a Sheetgo

Comparar

Como a Sheetgo se compara a outras ferramentas

Segurança

Como protegemos seus dados

Centro de confiança

Detalhes da nossa conformidade

Central de ajuda

Guias e respostas

Entre em contato com o suporte

Escrever para nossa equipe

Workflows

Criar processos com sua equipe

Automations

Conectar arquivos e automatizar tarefas

Como usar a função OFFSET no Planilhas Google

O OFFSET function in Google Sheets references a range of cells that are shifted ou displaced from a starting reference cell. You specify this displacement by a number of rows and columns. In other words, OFFSET references a range that is a specific number of rows and columns away from the starting cell.

If you want to offset multiple cells, you also indicate the size of the range of cells using height and width parameters.

Offset is a handy function that allows you to use dynamic ranges in formulas. This means that the function will adapt to changes in the spreadsheet, such as when you add new data or columns.

Sintaxe

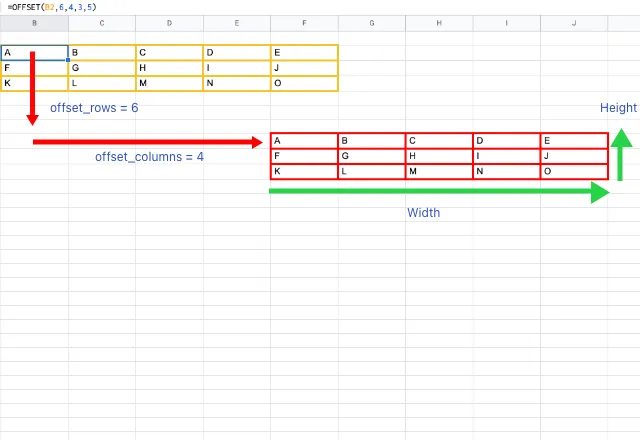
=OFFSET(cell_reference, offset_rows, offset_columns, [height], [width])

  • referencia_celula – the starting reference cell (or base cell) from which the range of cells is displaced.
  • offset_rows – the number of rows the range of cells displaces by. This takes in integer values, including negative numbers.
  • offset_columns – the number of columns the range of cells displaces by. Similar to offset_columns, this also takes in integer values, including negative numbers.
  • altura – an optional parameter that specifies the height of the returning range of cells, starting from the offset cell that the above three parameters determine. This can be ignored if the reference to return is a single cell.
  • largura – like height, this is an optional parameter that specifies the width of the returning range of cells starting from the offset cell, that the first three parameters determine. Similarly, you can also ignore this if the reference to return is a single cell.
OFFSET function 1

Here, I have typed some data into the red range of cells.

I am using the OFFSET function to reference that data in the gold range of cells, by typing the formula =OFFSET(B2,6,4,3,5).

39

Uma ferramenta para mesclar, dividir e filtrar todos os dados da sua planilha

Saiba como

How to use the OFFSET function

As is the case with all functions and formulas, the best way to understand OFFSET is to see it in use.

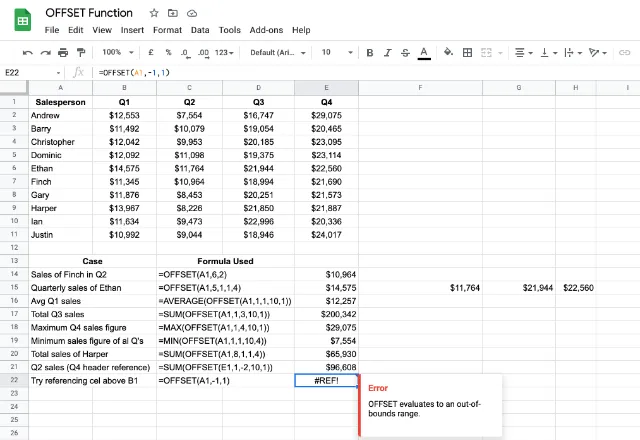
Below is some fictional sales data for a few employees across several business quarters.

As you can see, I have used a different OFFSET function in each row:
OFFSET function 2

If you use the OFFSET function directly, like I did in rows 2 and 3, it directly returns the range of cells and displays them across the spreadsheet. Therefore, for the case in row 3, the function displays the output in cells H3 to K3, because I specified that I wanted the range to have a width of 4.

You can also use the output range reference as an input to another array function, similar to what I did in rows 4 to 9.

If you reference a range of cells that are before the first row ou the first column, it will result in a #REF! error. You can see this in row 10, where I tried to reference a cell above A1 (which obviously doesn’t exist).

How to use OFFSET to create dynamic ranges

One of the main benefits of using the OFFSET function is that it allows you to create dynamic ranges. These are ranges that automatically adjust when you add new data to the spreadsheet.

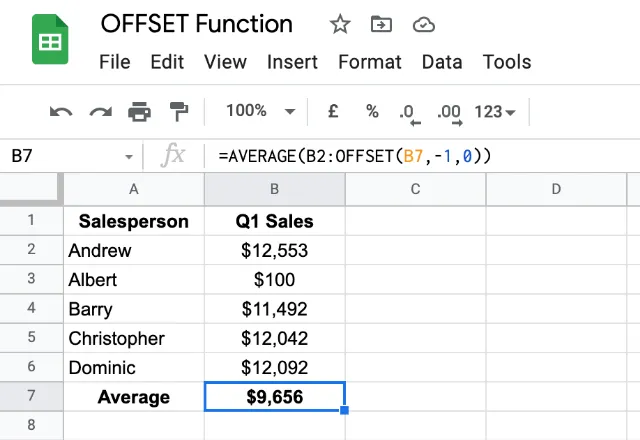
To illustrate this, I’ve taken a subset of the data from the previous example, and I’m using it to get the average Q1 sales for the salespeople shown.

OFFSET function 3

Instead of just using a typical AVERAGE function, I’ve combined it with the OFFSET function by typing =Average(B2:Offset(B6,-1,0)).

I am using the OFFSET function to define the range I want to be averaged. Here that is the array in cells B2 to B5.

However, instead of typing B5, I offset it, essentially saying “one cell above B6”. Doing this creates a dynamic range that will update if I add or remove data.

You can see this in the example below. Here I have added another salesperson, Albert, and the average sales updates automatically — thanks to the dynamic range.
OFFSET function 4

You will notice that the formula has adjusted automatically. Instead of showing B6 in the OFFSET function, it is now using cell B7 em vez disso.

#REF! Error – Circular reference

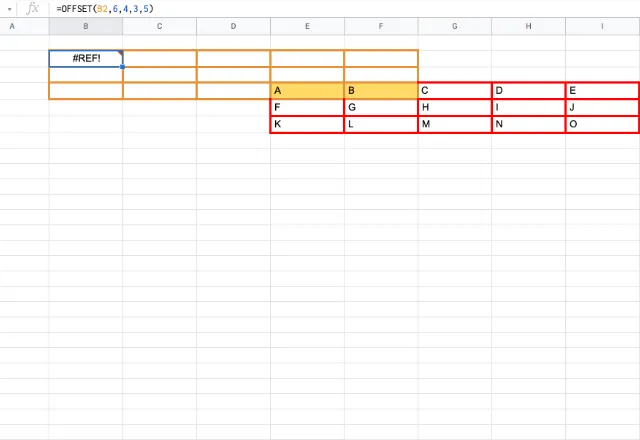
More often than not, you may come across instances where the OFFSET function output overlaps with the offset target, resulting in a circular reference.

In such scenarios, Google Sheets returns a #REF! error.

I’ve demonstrated this in the snapshot below with colored borderlines. You’ll notice that I highlighted the possible overlap in red borders and yellow fill.
OFFSET function 5

That’s how to get started with Google Sheets OFFSET function. Looking for more spreadsheet tutorials and tips? Check out our other posts below!

Nota do editor: Esta é uma versão revisada de uma postagem anterior que foi atualizada para maior precisão e abrangência.

Você também pode gostar...

Recursos e fórmulas do Google Sheets

Como encontrar a taxa de juros nominal usando o Planilhas Google

Sarah é uma jovem profissional que está tomando decisões financeiras importantes. De cartões de crédito a hipotecas, empréstimos estudantis e investimentos...
Recursos e fórmulas do Google Sheets

Extrair dados do Google Agenda para o Planilhas Google usando o Apps Script

Esta postagem foi publicada originalmente em nosso fórum da comunidade. Objetivo: Este guia demonstra como usar o Google Apps Script para extrair dados...
Recursos e fórmulas do Google Sheets

Usando a função PROPER para colocar a primeira letra de cada palavra em maiúscula no Planilhas Google

Observação: esta postagem foi publicada originalmente em nosso fórum da comunidade. Alguma vez você já precisou limpar uma lista de nomes, títulos ou qualquer...